9 Best Practices for Using AWS Access Analyzer

Maintaining a strong security posture is crucial in today’s digital landscape, and it begins with users. Trusting users with access to sensitive data and company assets is a web of complexity, and one bad apple or security gap can knock all the dominos down. 

In fact, Verizon’s 2023 Data Breach Investigations Report noted that 74% of breaches include the human element, either through human error, privilege misuse, social engineering, or stolen credentials.

AWS Access Analyzer was created to address this problem and provide the information you need to achieve the principle of least privilege (PoLP). It plays a vital role in achieving a secure environment by comprehensively analyzing your resource policies, helping you identify any potential security vulnerabilities, and ensuring compliance. 

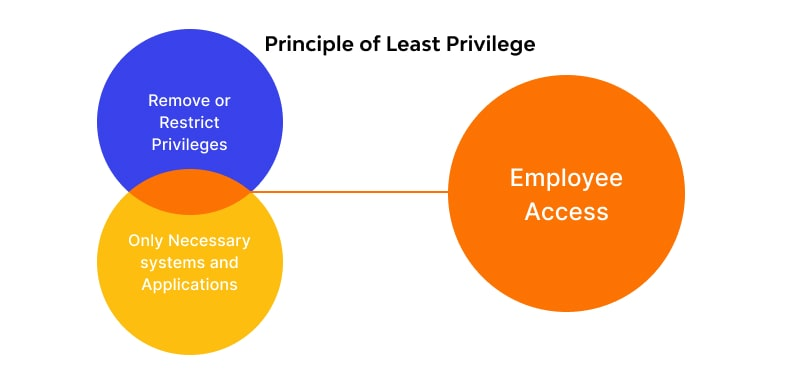
What is the Principle of Least Privilege?

The principle of least privilege states that a user should only have access to the specific data, resources, and applications needed to complete a required task, helping organizations improve their overall security posture and reduce the attack surface. 

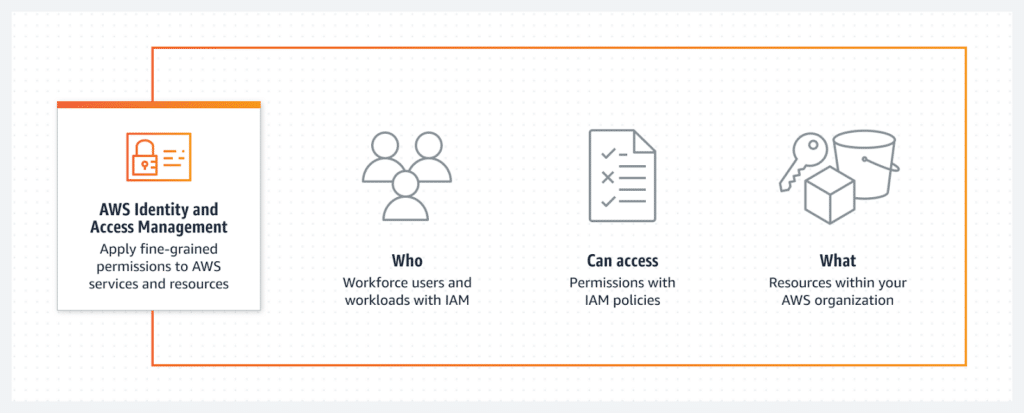
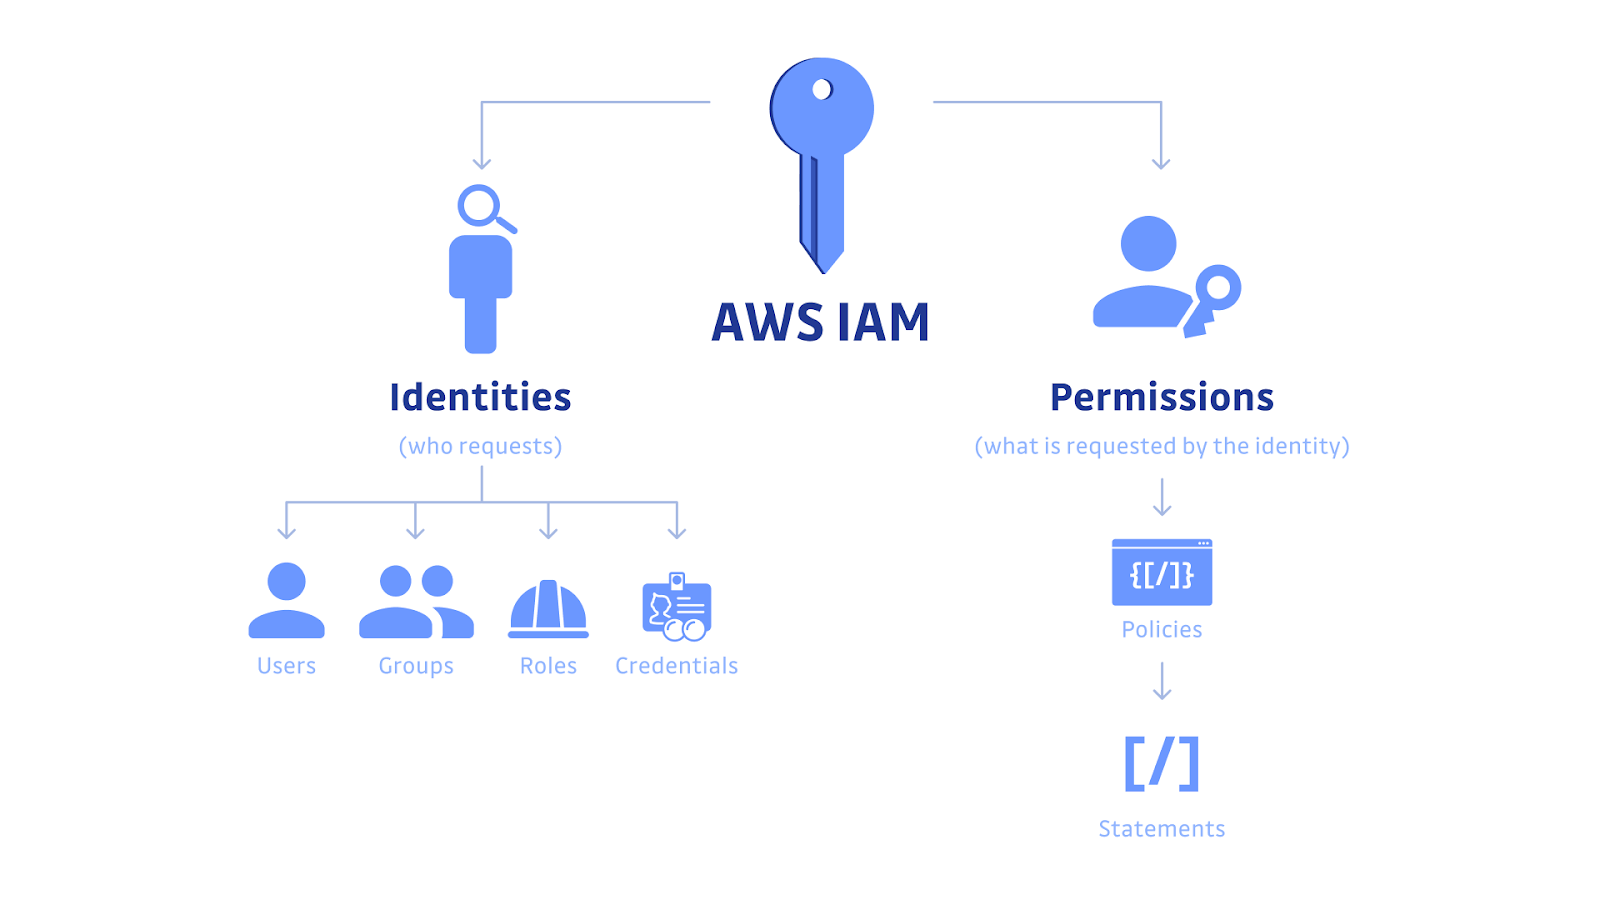
What is AWS IAM Access Analyzer?

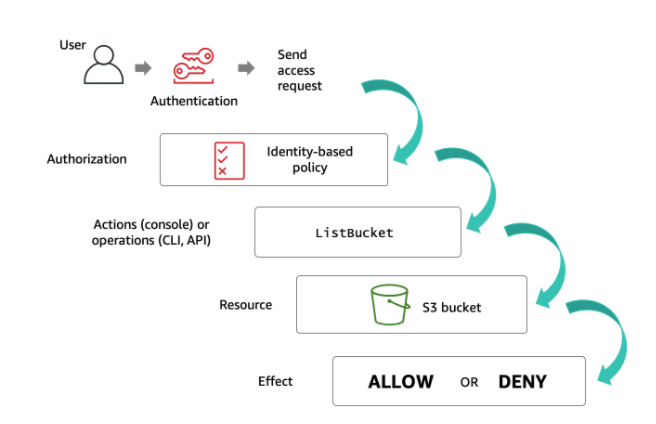
AWS Identity and Access Management Access Analyzer guides you toward least privilege by providing capabilities to set, verify, and refine permissions. IAM Access Analyzer uses provable security to analyze external access and validate that your policies match your specified corporate and data security standards.

AWS Access Analyzer

What Resource Types Does IAM Access Analyzer Analyze?

IAM Access Analyzer can analyze various resource types within an AWS environment. Some of the key resource types supported by IAM Access Analyzer include:

  • Amazon S3 buckets
  • Amazon SQS queues
  • AWS Key Management Service (KMS) keys
  • AWS Identity and Access Management (IAM) roles
  • AWS Lambda Functions and Layers

These are just a few examples of the resource types IAM Access Analyzer can analyze. It is important to note that IAM Access Analyzer continues to expand its support for additional resource types, providing organizations with comprehensive coverage for their AWS environments. 

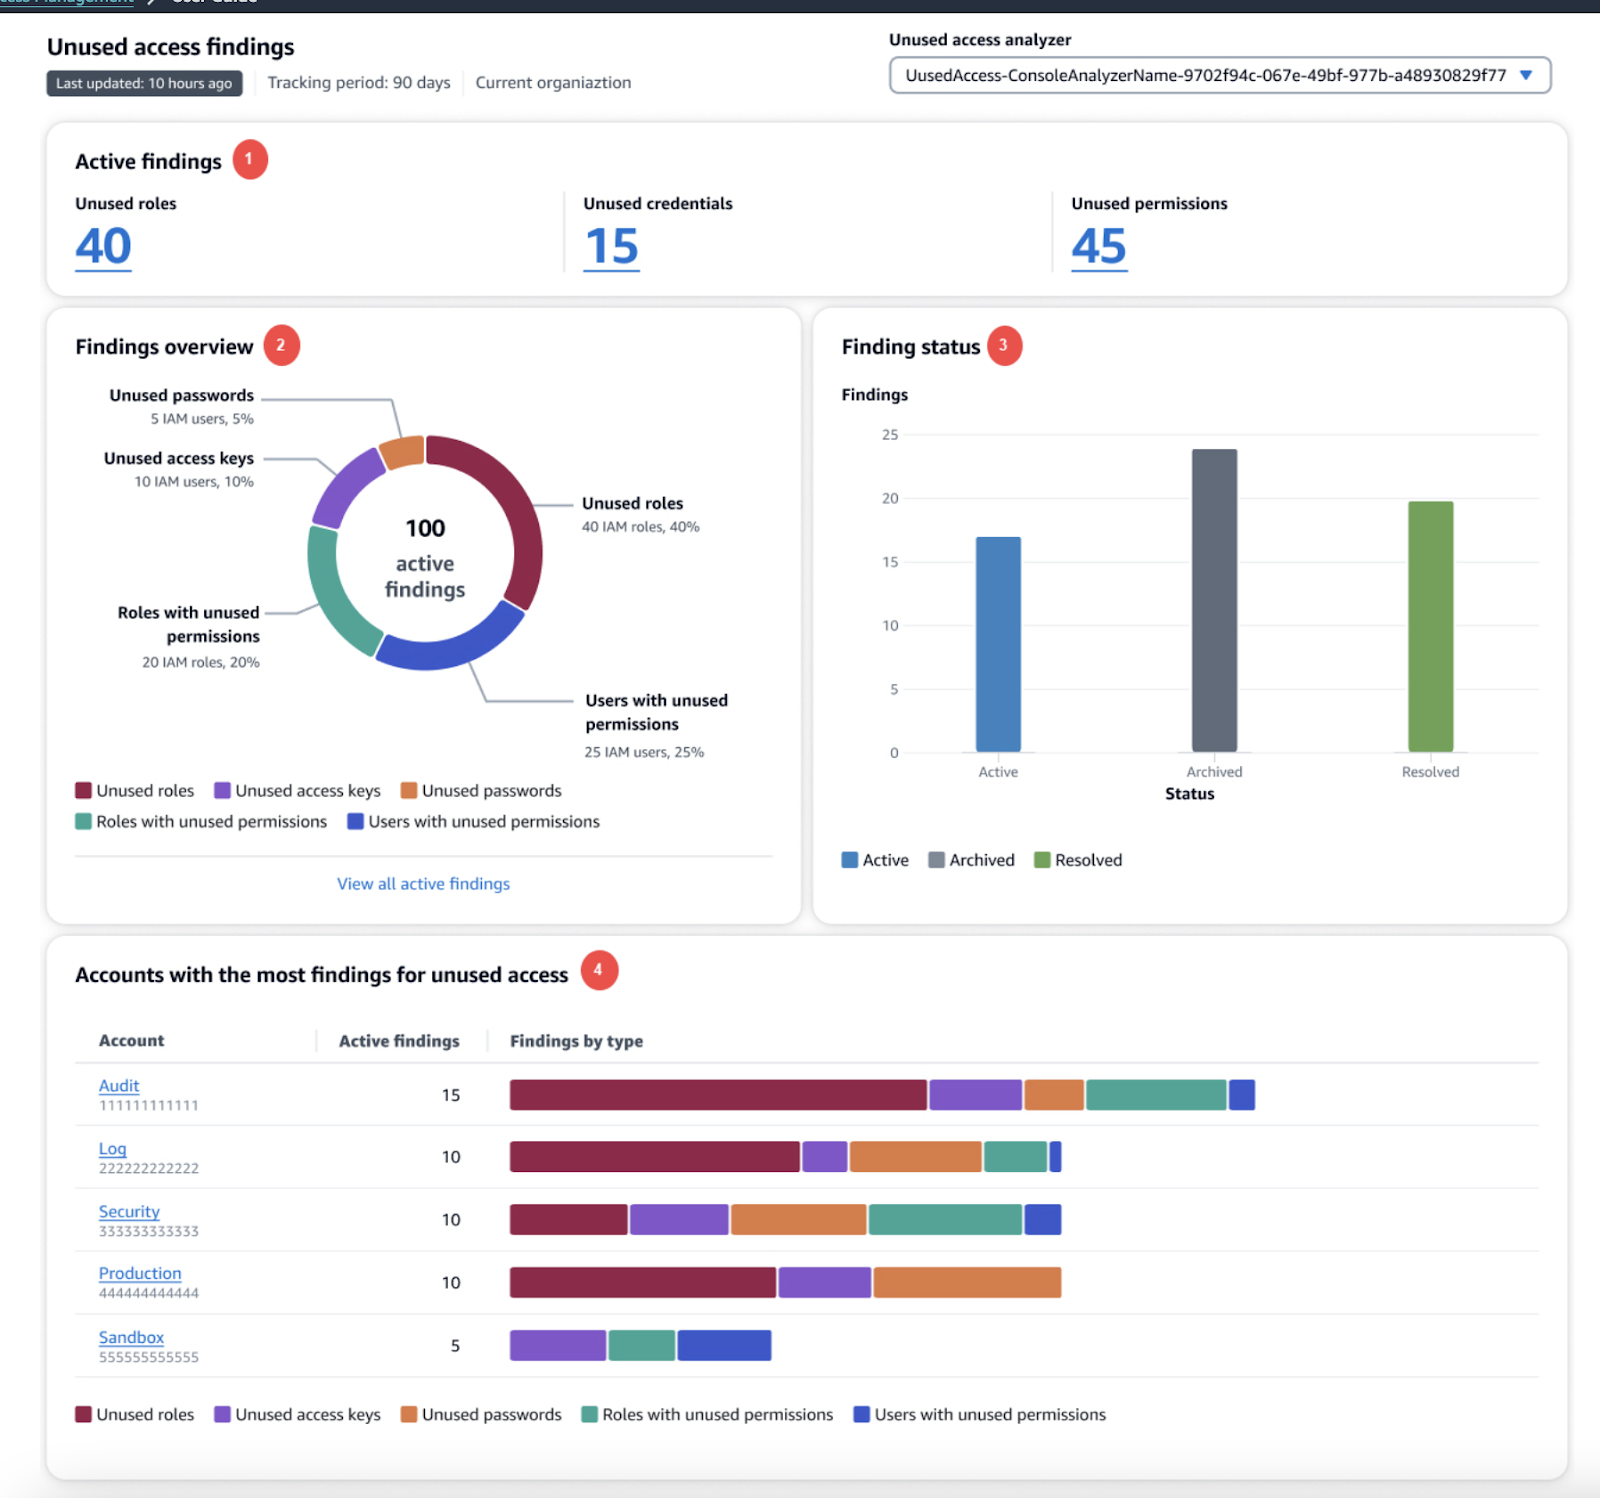
External Access Findings vs Unused Access Findings

Regularly monitoring and managing external access findings and addressing unused access findings will help you maintain a secure AWS environment and minimize the risk of unauthorized access. Let’s look at the difference between external and unused access.

External access

External access findings are critical in identifying potential vulnerabilities caused by access from external entities, such as third-party accounts or entities outside your organization. These findings provide valuable insights into the permissions accessible to entities beyond your immediate control. By analyzing external access findings, you can identify and address potential security risks arising from unintended or unauthorized access.
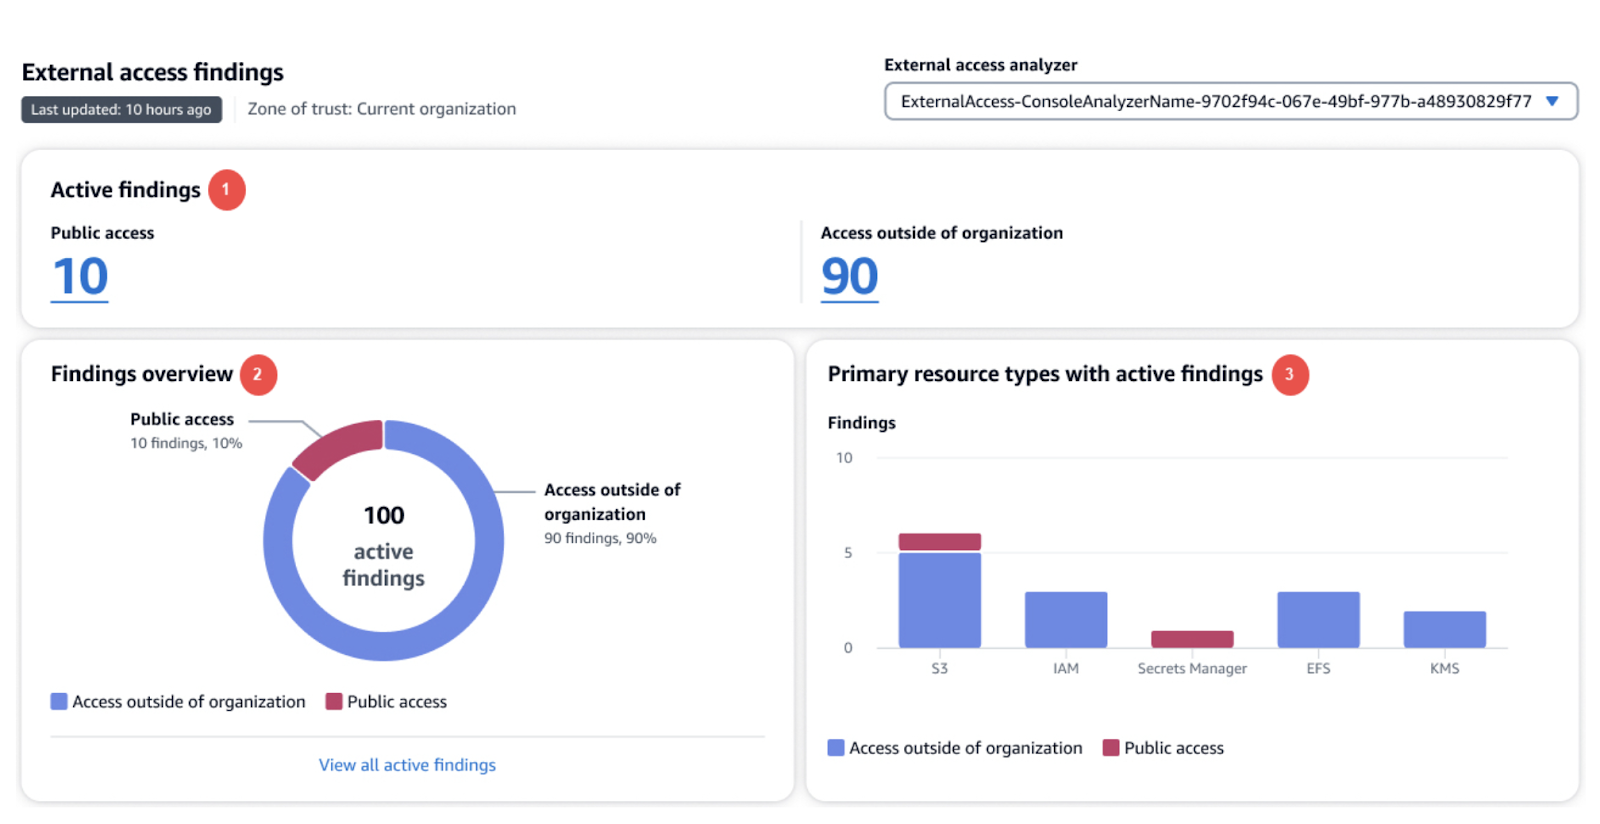
Unused access

Unused access findings shed light on permissions granted but not utilized, leaving your resources vulnerable to unauthorized access. These findings provide insights into the permissions that are not actively used, indicating potential areas where access can be revoked or tightened.

Why Use AWS IAM Access Analyzer? 

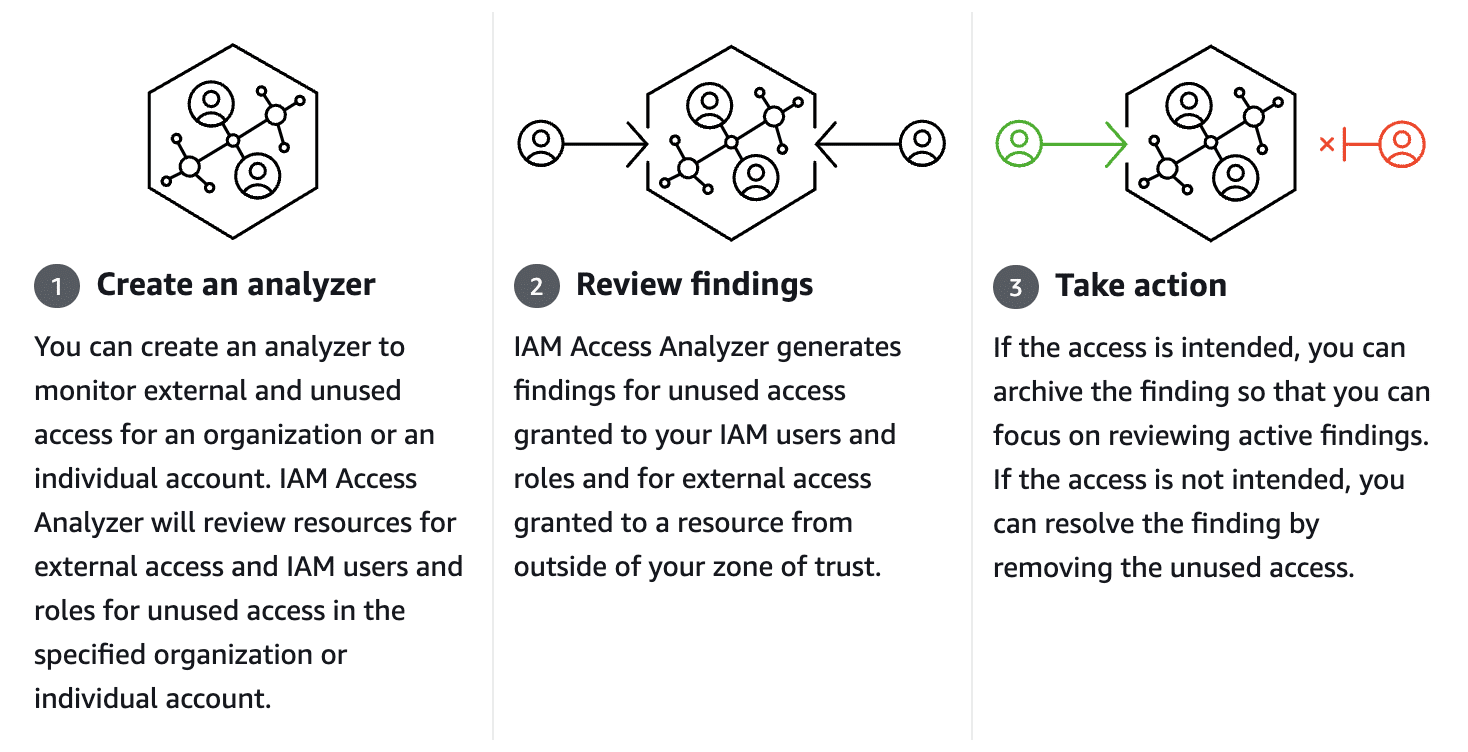
With the increasing complexity of cloud environments, it’s essential to have a tool that can identify any security loopholes and policy misconfigurations. AWS Access Analyzer achieves this by providing a detailed analysis of your resource policies, giving you insights into potential vulnerabilities, and helping you remediate them effectively.

You can proactively identify and resolve any overly permissive access policies by leveraging AWS Access Analyzer to protect your sensitive data and help you avoid costly data breaches and compliance violations. With AWS Access Analyzer, you can confidently ensure that your cloud resources are configured securely and in line with your organization’s security best practices.

Key Benefits of AWS Access Analyzer

AWS Access Analyzer offers a range of powerful features and capabilities to help you safeguard your AWS resources. 

  • Policy Validation: It thoroughly examines your resource policies, including AWS IAM policies, S3 bucket policies, and more. It analyzes these policies against best practices and provides actionable recommendations to improve security and compliance.
  • Granular Insights: It provides detailed insights into the specific resource and policy that may expose your environment to potential security risks. This granular level of analysis allows you to quickly identify the root cause of any vulnerabilities and take immediate action. 
  • Resource Coverage: It supports a wide range of AWS resources, including IAM roles, Amazon S3 buckets, AWS KMS keys, and more. This comprehensive coverage ensures that you can analyze and secure all critical components of your cloud infrastructure.
  • Continuous Monitoring: It enables you to continuously monitor your resources for any policy changes or new vulnerabilities. By setting up automated alerts, you can stay informed about potential security risks and take proactive measures to mitigate them.

9 Best Practices for Using AWS Access Analyzer

Now that you have AWS Access Analyzer up and running, let’s explore how to make the most of its capabilities. 

  1. Define Custom Analyzers

In addition to the default analyzers provided by Access Analyzer, consider creating custom analyzers tailored to your specific needs. Custom analyzers allow you to focus on critical resources and policies, ensuring a more targeted analysis.

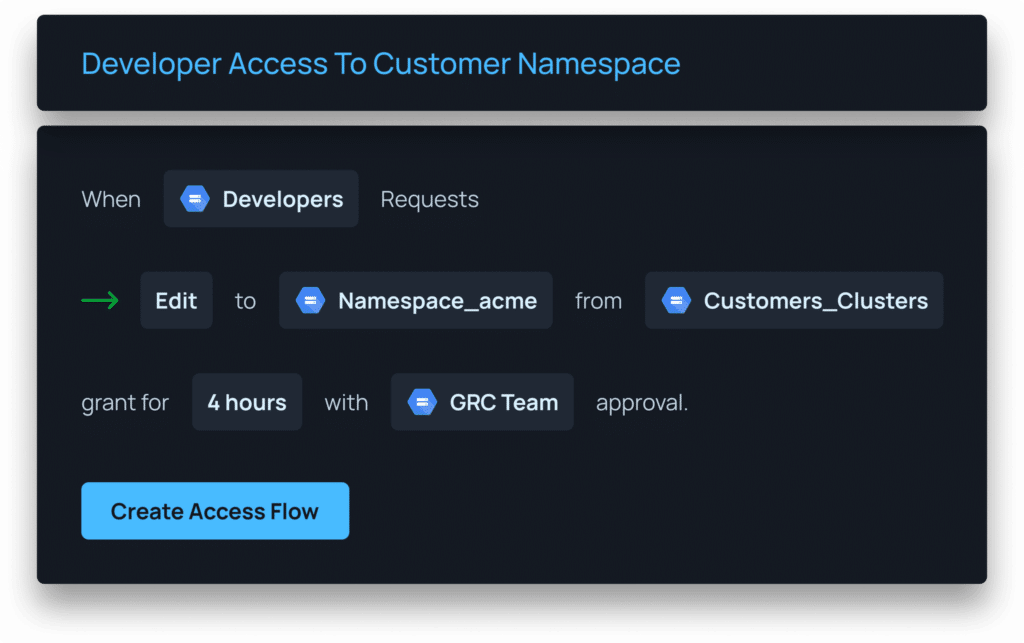
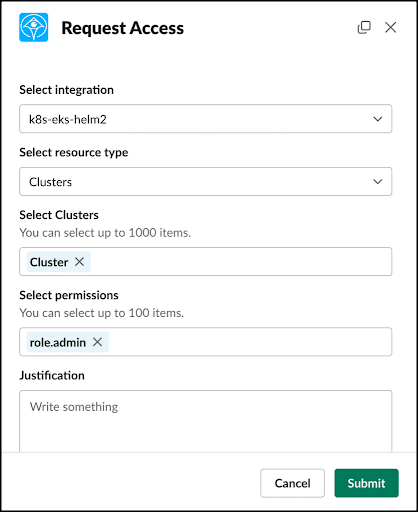
  1. Utilize Tools for Granular, Just-in-time Access

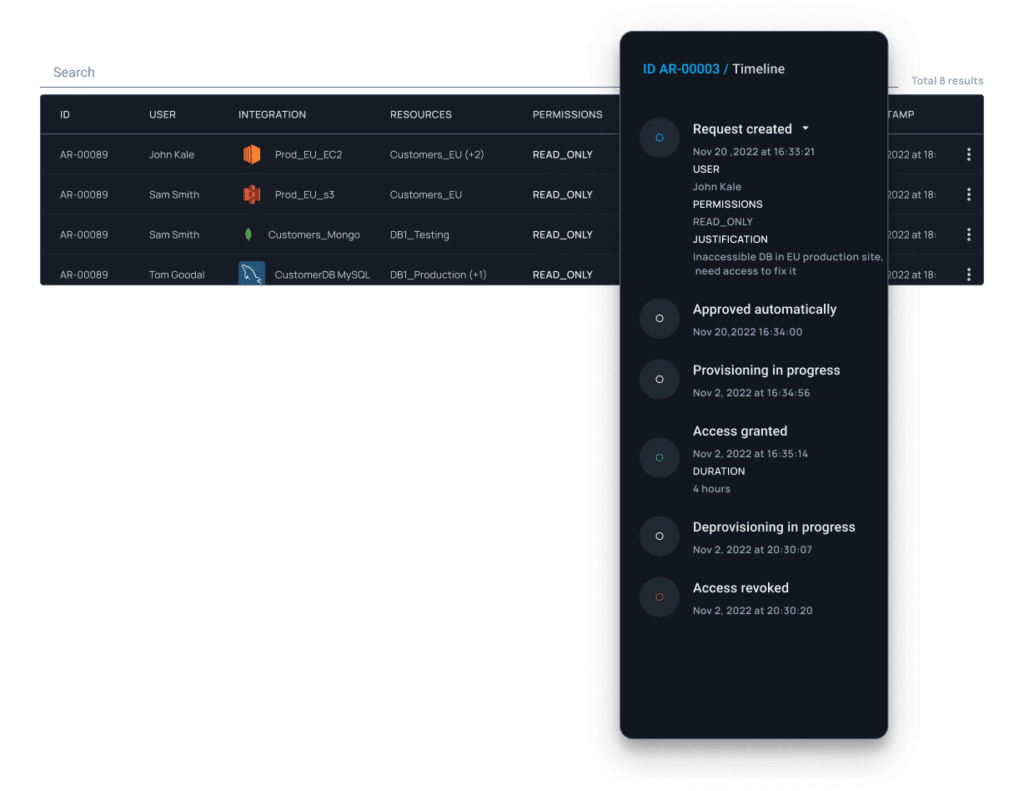
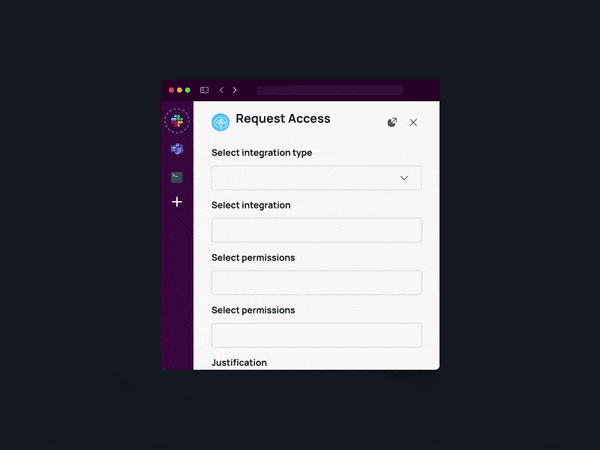
Remove standing privileges quickly and easily. With Apono’s tool, you can provide right-size policies down to any level of granularity needed, all in one centralized location.

  1. Regularly Review Findings

Make it a routine to review the findings generated by Access Analyzer regularly. This strategy helps you stay updated with any new vulnerabilities or policy changes and allows you to address them promptly. 

  1. Leverage Automated Remediation

Access Analyzer provides automated remediation actions for certain findings. Take advantage of this feature to streamline the remediation process and save time. However, always review the proposed changes before applying them to ensure they align with your security requirements.

  1. Integrate with AWS Security Hub

AWS Security Hub provides a centralized view of your security posture across multiple AWS accounts. Integrating Access Analyzer with Security Hub allows you to consolidate and streamline your security operations, making it easier to manage and respond to security findings. 

  1. Regularly Run Analyses

Schedule regular analyses with Access Analyzer to continuously monitor your resources for any potential security vulnerabilities. By automating this process, you can maintain a proactive security approach and quickly remediate any identified issues. 

  1. Prioritize Findings

Access Analyzer provides a severity level for each finding. Focus on high-severity findings first, as they pose a greater risk to your security posture. By prioritizing your actions based on severity, you can efficiently allocate your resources and address the most critical vulnerabilities first.

  1. Collaborate with Stakeholders

Security is a shared responsibility, and involving relevant stakeholders in the remediation process is crucial. Collaborate with your development teams, system administrators, and other stakeholders to ensure that everyone is aware of the findings and actively participates in the remediation efforts, helping promote security awareness.

  1. Document Remediation Actions

Keep track of the actions taken to remediate the findings generated by Access Analyzer. This documentation helps maintain an audit trail and ensures that you have a record of the steps taken to address any security vulnerabilities.

Use Apono with Access Analyzer

Following the best practices outlined in this article, you can utilize Access Analyzer effectively while using third-party tools to easily create your policies and minimize your attack surface. 

Apono perfectly complements Access Analyzer by allowing you to take the results from Analyzer and create right-size policies in a few steps:

Step 1: Enable Access Analyzer in your AWS account. 

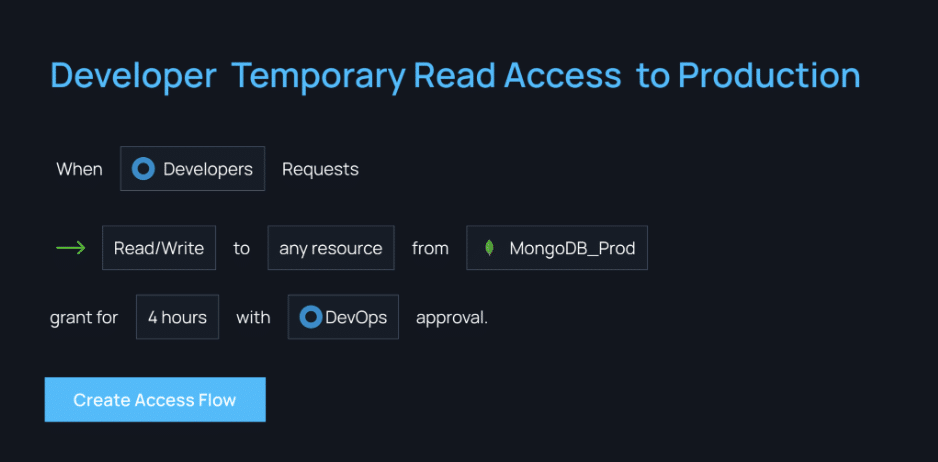
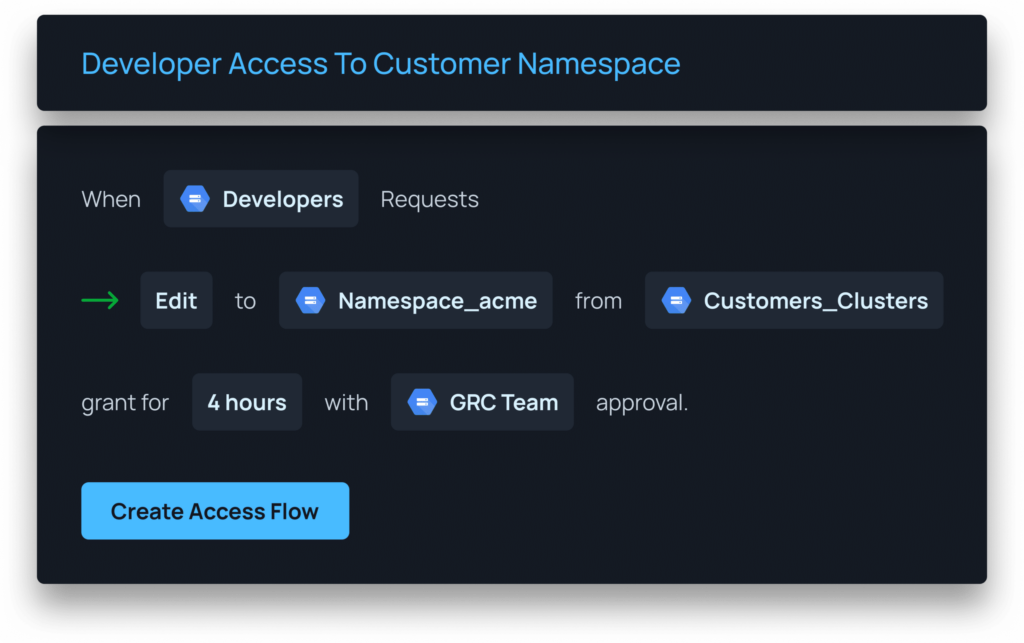
Step 2: Go to Apono and start by creating broad policies, such as access to all account data, and then enable access in your account.

Step 3: After a certain period of time, check the Access Analyzer results to see how users utilize the access. Then, split them into two: what’s used and what’s not used. 

Step 4: Now, create two workflows in Apono. The first will be based on used policies, and the other will be for just-in-time access. Then repeat the process every so often, and you’ll always be safe. 

Get started with Apono for free.

A Step-by-Step Guide to Creating a Data Security Policy

Failure to secure data is not an option. The risk of significant financial losses, operational downtime, reputational damage, and regulatory fines grows every year, and protecting your organization’s assets is more important than ever. 

The average data breach cost rose to a staggering $4.45 million in 2023 and peaked at $11 million and $5.9 million in the healthcare and financial industries, respectively. Just one data breach can cause a major headache for your company, which is why it’s time to prioritize your data security policy.

What is a Data Security Policy? 

A data security policy covers the administration of data within an organization, aiming to safeguard all data your company utilizes, manages, and retains. While a data security policy is not required by law, it helps your organization adhere to data protection regulations such as GDPR. These policies should cover all data (at rest and in transit), including on-premises storage devices, off-site locations, cloud services, and endpoints such as laptops or mobile devices.

Why Do You Need a Data Security Policy?

A data security policy benefits your business in many ways:

  • Meet compliance requirements and comply with global standards like GDPR and ISO 27001. 
  • Build a culture of security awareness by clearly outlining best practices for managing data and helping all employees understand their level of responsibility.
  • Prevent data breaches and avoid the loss of data and customer trust caused by security incidents, as well as legal and financial penalties. 

Source

6 Essential Elements of a Data Security Policy

  1. Security tools: Any third-party tools you need to support policy implementation.  
  2. Scope: The scope of the policy, who it affects, and how it integrates with other frameworks like identity governance
  3. Inventory: Inventory of your organization’s data and who manages or maintains it 
  4. Stakeholders: The stakeholders involved in the policy creation and who enforce it. 
  5. Implementation roadmap: A rollout timeline, plus a timeline for regular policy reviews
  6. Clear policy objectives: Why is the policy needed, and what is the goal of implementing it? 

A Step-by-Step Guide to Creating a Data Security Policy 

Creating a data security policy involves several steps, including the following:

  1. Assessment and Analysis

Before developing a policy, you must assess your organization’s security needs. This step involves evaluating:

  • The types of data you handle.
  • The sensitivity of that data.
  • The potential impact of a security breach. 

Data classification is a useful tool in this process, allowing you to categorize data based on its level of sensitivity and define security controls for each category.

  1. Legal and Regulatory Compliance

Understanding the legal and regulatory requirements that apply to your industry is crucial for ensuring compliance with relevant laws, regulations, and industry standards on data security, such as GDPR, HIPAA, or PCI DSS. Different industries and jurisdictions have specific data protection standards, and failing to keep up with compliance could incur costly penalties.

Source

  1. Define Data Classification

A data classification system is a fundamental component of a data security policy. It helps you categorize data based on its sensitivity and importance to your organization. This classification will guide the level of protection and access controls applied to each type of data.

  1. Start by identifying the different types of data your organization handles, such as personal information, financial data, intellectual property, or trade secrets. 
  2. Classify each type of data based on confidentiality, integrity, and availability requirements.
  3. Once you have established your data categories, define the security controls for each category, like encryption, access controls, data retention policies, or data backup procedures.
  4. Ensure that the classification system is well-documented and communicated to all employees.
  1. Access Controls and Permissions

Controlling access to sensitive data is vital in preventing unauthorized disclosure or modification. Access control strategies include:

RBAC

Start by implementing role-based access control (RBAC). RBAC involves defining roles and responsibilities for data access and implementing appropriate authentication mechanisms for each. You can assign specific roles and permissions to individuals based on their responsibilities, ensuring that employees only have access to the data necessary to perform their duties.

MFA

Additionally, consider implementing multi-factor authentication (MFA) for accessing sensitive systems or data. MFA enhances security by mandating that users supply multiple forms of identification. For example, they can include a password and a unique code dispatched to their mobile device.

Source

Encryption

Encryption is another essential security measure to protect data in transit and at rest. Implement encryption protocols, such as Secure Sockets Layer (SSL) or Transport Layer Security (TLS), to safeguard data. Use encryption methods like full-disk or file-level encryption for data at rest.

  1. Data Handling Procedures

Data handling procedures are crucial for data confidentiality, integrity, and availability. They encompass all stages of data lifecycle management: collecting, storing, transmitting, and disposing of data securely. You can use encryption methods, backup procedures, and guidelines for remote access.

  1. Incident Response Plan

An incident response plan (IRP) defines how to handle security incidents and data breaches quickly. It outlines steps for detecting, reporting, and responding to security breaches. Best practices for developing a great incident response plan include:

  • Defining responsibilities of key stakeholders.
  • Communication protocols, such as who to notify and what information to share.
  • Step-by-step procedures for handling incidents.
  • Scheduling regular IRP reviews and updates.
  • Criteria for isolating or shutting down affected systems.
  1. Employee Training and Awareness

Human error remains one of the primary causes of data breaches. So, educating employees on data best practices is essential for minimizing the risk of unauthorized access and building a culture of cybersecurity awareness.

Regular training sessions and awareness campaigns can reinforce good security practices. Training programs should cover topics such as password hygiene, recognizing phishing attempts, secure handling of sensitive information, and reporting security incidents.

You can tailor the training to employees’ roles and responsibilities and implement regular top-ups to make sure they remain vigilant.

Source

  1. Regular Audits and Reviews

Regular security audits and assessments help you achieve ongoing compliance and identify security gaps. During security audits, you can introduce measures like scanning for security vulnerabilities, penetration testing, and reviewing access logs, plus implement procedures for auditing and reviewing the effectiveness of the data security policy. As technology, threats, and regulations evolve, it is essential to stay up to date and adapt your security measures accordingly.

  1. Documentation and Communication

Document the data security policy in a clear and easily accessible format. Ensure all employees are aware of the policy and provide channels for them to seek clarification or report concerns.

  1. Continuous Improvement

Data security is an ongoing process. You can continuously identify areas for improvements or updates and amend the policy based on feedback, the detection of emerging threats, and changes in data handling requirements.

You can also monitor security metrics, such as the number of security incidents or vulnerabilities detected, to assess the effectiveness of your security controls. Plus, it’s essential to implement a feedback loop for employees to report potential security gaps.

Managing Data Security Policies with Apono

Data security is a critical concern for businesses of all sizes and industries. With the growing number of cyber threats, you must take steps to protect information from unauthorized access, disclosure, alteration, or destruction.

Apono, The DevSecOps platform, allows you to enforce security policies from a single location across all databases, data warehouses, and data lakes.

Get started with Apono for free.

A Step-by-Step Guide to Creating an AWS IAM Policy Document

Keeping your cloud resources safe from prying eyes and bad actors is a continuous and relentless challenge, making it one of the most critical responsibilities for IT teams. 

When it comes to the cloud, scalability is a key challenge. Managing roles and permissions for hundreds or even thousands of employees is daunting, but you can’t afford to slip up when 49% of breaches involve stolen credentials. 

To keep up with the scale, speed, and flexibility of cloud IAM requirements, many administrators leverage web services to assist in managing access to cloud environments. An AWS IAM policy document, a feature of AWS’s IAM ecosystem, is one way to keep unauthorized individuals away from your cloud data. 

What is AWS IAM?

AWS Identity and Access Management (IAM) is a service that allows you to control access to your AWS services and resources securely. It enables you to create and manage user accounts, assign individual permissions, and enforce strict policies to protect your valuable data.

What are AWS IAM Policies?

AWS IAM policies are documents that play a critical role in defining permissions and access controls within your AWS environment. They help you manage and secure your AWS resources by allowing or denying specific actions for different users or groups. With the right IAM policy in place, you can ensure that only authorized individuals have access to sensitive data and critical resources. 

To understand IAM policies better, let’s break down the components of an IAM policy document. 

6 Types of AWS IAM Policies

There are a few different policy types you can use in AWS:

  1. Identity-based policies: Grant permissions to the relevant identities (e.g., users, groups, or roles).
  2. Resource-based policies: Decide which specific actions can be performed on certain resources and define the conditions that the action applies to. 
  3. Permissions boundaries: Define the maximum permissions that an identity-based policy can grant to an entity. 
  4. Organizations SCPs: Define the maximum permissions for account members of an organization using an AWS Organizations service control policy (SCP).
  5. Access control lists (ACLs): Control which principals in other accounts can access the relevant resource that the ACL is attached to.
  6. Session policies: Limit the permissions that the role or user’s identity-based policies grant to the session. 

Source

What is an AWS_IAM_Policy Document?

An IAM policy document consists of several key components that define the permissions and access controls:

  • Version: The version of the IAM policy language being used.
  • Statement: The main section of the policy document that contains one or more policy statements.
  • Policy Statement: Each policy statement defines the permissions and access controls. It consists of the following elements:
    • Effect: This can be either “Allow” or “Deny” and determines whether the policy statement allows or denies access.
    • Action: Specifies the AWS service actions that are allowed or denied.
    • Resource: Specifies the AWS resources to which the policy statement applies.
    • Condition: Allows you to define additional conditions for granting or denying access.

Source

A Step-by-Step Guide to Creating an AWS_IAM_Policy Document

You can use the AWS Management Console or the AWS Command Line Interface (CLI) to create an IAM policy document. In this guide, we’ll use the AWS Management Console for simplicity. 

Step 1: Accessing the IAM Console

Log in to your AWS Management Console and navigate to the IAM service to get started. Once you’re in the IAM console, you can begin creating your IAM policy document.

Step 2: Creating a New IAM Policy 

In the IAM console, click “Policies” in the left-hand menu and then click the “Create policy” button. This will open the policy creation wizard.  

Step 3: Defining Policy Statements and Actions

In the policy creation wizard, you’ll be prompted to define the policy statements and actions. You can choose to allow or deny specific actions for different AWS services and resources. This is where you specify the permissions and access controls for your IAM policy document.

Step 4: Specifying Resources and Conditions

After defining the policy statements and actions, you can specify the AWS resources the policy applies to. This action allows you to control access to specific resources based on your organization’s requirements.

Additionally, you can add conditions to the policy to refine access controls further. Conditions allow you to specify additional factors that must be met for the policy statement to take effect. For example, you can set conditions based on IP addresses, time of day, or other attributes.

Step 5: Reviewing and Saving the IAM Policy

Once you have defined the policy statements, actions, resources, and conditions, you can review the policy details and make any necessary changes. After reviewing, you can save the policy and give it a name.

Step 6: Attach the IAM Policy to Users, Groups, or Roles

Now that you have created an IAM policy document, you need to attach it to the appropriate users, groups, or roles within your AWS environment.

To attach an IAM policy, go to the “Users,” “Groups,” or “Roles” section in the IAM console, select the desired entity, and click on the “Attach policy” button. You can search for and select the policy you created from there.

Step 7: Test and Validate the IAM Policy

Before deploying your IAM policy document, testing and validating it to ensure it functions as intended is crucial. 

AWS provides a simulation tool that allows you to test your IAM policies before applying them. The IAM policy simulator lets you simulate various scenarios and evaluate the access permissions for different AWS services and resources.

By running simulations and reviewing the results, you can identify any issues or unintended consequences of your IAM policy document. This helps ensure that your policies are correctly configured and align with your organization’s security requirements. 

5 Best Practices for IAM Policy Management 

Now that your AWS IAM policies are successfully set up, the work isn’t quite over yet. Here are some IAM best practices to manage your policies effectively.

  1. Regular Review: Regularly review and update your IAM policies to reflect any changes in your organization’s security requirements or resource access.
  2. Least Privilege: Follow the principle of least privilege, granting only the necessary permissions for users, groups, or roles to perform their specific tasks.

Source

  1. Separation of Duties: Implement separation of duties by assigning different policies to different users or groups to prevent unauthorized access.
  2. Policy Versioning: Use policy versioning to track and manage changes to your IAM policies over time.
  3. Audit Logging: Enable AWS CloudTrail to monitor and log all API activity related to your IAM policies.

Alternatively, Do It All Without Leaving Slack

Creating an AWS IAM policy document is a crucial step in enhancing your AWS security. By understanding the components of an IAM policy document, creating and attaching policies, and following best practices, you can effectively manage and secure your AWS resources.

Whether you’re an AWS beginner or an experienced user, this step-by-step guide has equipped you with the necessary knowledge to create and implement an AWS IAM policy document that aligns with your organization’s security requirements. Strengthen your AWS security today by creating robust IAM policies that safeguard your critical resources and data.

Integrate Apono with AWS

Apono integrates with AWS natively, which allows you to manage access to your S3 buckets, IAM roles and groups, EC2, EKS clusters, RDS instances, and many more. 

When you integrate Apono with AWS, you can harness:

  • Automatic de-provisioning: Eliminate the need to manually de-provision tasks with time-restricted access workflows. 
  • Reduction in over-privileges: Discover existing privileges granted to AWS roles, groups, and services and convert them to on-demand access flows to reduce over-privileges.
  • Self-service access: Empower your developers to gain self-service access to AWS services, buckets, instances, and more using Slack.
  • Automated approval workflows: Create approval workflows for specific sensitive resources.
  • Restricted third-party access: Grant third-party (customer or vendor) time-based access to specific S3 buckets, RDS, or EC2 instances with MFA verification.
  • Access reviews: The detailed access audit shows you who was granted access to which specific instances, buckets, or other resources in AWS.

Apono helps you avoid the tedious task of entering the AWS Identity Center admin console every time you need to grant or revoke access. With Apono, users can request and reviewers can grant permissions – without leaving Slack.

Get started with Apono for free. 

Navigating the Future: DevOps Predictions for 2024

As technology continues to evolve at an unprecedented pace, the field of DevOps is no exception. DevOps, the cultural and professional movement that aims to improve collaboration between software development and IT operations, is predicted to transform, expand, and evolve significantly in 2024. In this blog post, we explore some key predictions for the DevOps landscape in the coming year.

GenAI Solidifies Its Place in DevOps:

It’s no understatement to say that generative AI (GenAI) was a core theme of 2023. Continuing the trend in 2024, the integration of GenAI into DevOps practices is expected to become more prevalent.

“One of the most interesting things I’m anticipating in the Dev/DevOps ecosystem is the work with generative AI tools, and how they can help us in our day to day work,” says Apono engineer Naor Guetta. “There will be tons of inventions in this space, which potentially can be life changing.”

GenAI solutions will enhance automation, predictive analysis, and anomaly detection, leading to more efficient and reliable software development and deployment processes. Intelligent algorithms will play a crucial role in optimizing workflows, identifying bottlenecks, and predicting potential issues before they escalate.

Shifts in the IaC Landscape:

In 2024, one noteworthy trend that could reshape the DevOps landscape is the increasing influence of cloud providers on infrastructure as code (IaC) tools, particularly Terraform. Terraform, developed by HashiCorp, has been a widely adopted IaC tool, allowing users to define and provision infrastructure using a declarative configuration language. However, there is a growing possibility that major cloud providers may offer their own IaC solutions. “AWS and GCP have their versions, and other emerging products do this, but adoption seems slow at the moment so I’m hoping it will catch up in 2024,” adds Alon Makovsky, DevOps lead at Apono.

Another predicted IaC shift is the traction behind GitOps, a set of practices that leverage version control systems like Git for managing IaC. This approach provides a declarative, version-controlled way to manage infrastructure changes, promoting collaboration and traceability. Organizations will increasingly adopt GitOps to streamline continuous delivery pipelines, enhance visibility, and ensure reproducibility across different environments.

DevSecOps Takes Center Stage:

Security has always been a top priority in software development, and in 2024, the integration of security into DevOps workflows (DevSecOps) will become even more crucial. With an increasing number of cyber threats, organizations will prioritize the proactive inclusion of security measures throughout the software development lifecycle. 

Automated privileged access governance, vulnerability scanning, and compliance management will be integral components of DevOps pipelines. Especially with the SEC’s new policies, having maximum visibility into potential threats, incident response processes, and audit trails will be a necessity.

Serverless Architectures Redefine Deployment:

Serverless computing, which allows developers to build and run applications without managing infrastructure, will continue to reshape the deployment landscape in 2024. DevOps teams will increasingly adopt serverless architectures to enhance scalability, reduce operational overhead, and achieve faster time-to-market. This shift will require organizations to reevaluate their monitoring, logging, and debugging strategies to accommodate the unique challenges of serverless environments.

Multi-Cloud Strategies Become Standard:

The adoption of multi-cloud strategies is set to become the norm in 2024. Organizations will leverage multiple cloud providers to mitigate risks, avoid vendor lock-in, and optimize costs. DevOps practices will evolve to seamlessly integrate with different cloud platforms, emphasizing interoperability and portability of applications. Automation tools – such as for just-in-time access – will play a pivotal role in managing complex multi-cloud environments efficiently.

Continued Emphasis on Observability:

Observability, encompassing monitoring, logging, and tracing, will continue to be a focal point in DevOps practices. In 2024, there will be an increased emphasis on implementing comprehensive observability solutions to gain insights into application performance, troubleshoot issues, and optimize system behavior. Advanced analytics and visualization tools will enhance the ability to understand and respond to complex, distributed systems.

DevOps in 2024

As we step into 2024, the DevOps landscape is poised for significant advancements driven by emerging technologies and evolving best practices. Between GenAI, IaC, and DevSecOps, DevOps professionals have plenty to look forward to. Embracing these trends will empower organizations to navigate the ever-changing technological landscape and deliver high-quality software with increased efficiency and resilience.

privileged access
Permissions in MySQL

Mastering Roles in MySQL: Your Ultimate Guide

Intro to Roles in MySQL

Diving into the world of roles in MySQL can seem daunting, especially when you’re trying to figure out permissions. Yet, when properly understood and managed, these roles and permissions can make your DevSecOps experience much smoother. Whether you’re a seasoned MySQL user or just starting, this guide will offer you insights into mastering roles in MySQL.

Understanding the Basics of Roles in MySQL Permissions

In MySQL, permissions, also known as privileges, serve as the gatekeepers of your database. They are the digital guardians that determine who can enter the system, where they can go, and what they can do once they’re inside. Picture them as keys, with different keys granting access to different parts of your database.

These permissions span a wide array of possibilities. For instance, the SELECT permission is like a reading pass, letting users peer into the contents of a database, but not alter it. On the other hand, the ALL PRIVILEGES permission acts as a master key, opening all doors and allowing the holder to do as they please within the MySQL system.

Assigning these permissions appropriately can act as a formidable defense mechanism for your database, ensuring its safety while also maintaining its functionality. Like a well-oiled lock system, correctly managed permissions can help make sure that only the right people have access to the right parts of your database, protecting it from potential security breaches.

In the end, understanding MySQL permissions isn’t just about learning the commands; it’s about grasping the pivotal role they play in securing your database and controlling its operations. So, let’s dive deeper and unravel the different types of MySQL permissions, and how you can master their allocation and revocation to fortify your database security.

MySQL’s Four Main Types of Permissions

The categorization of permissions in MySQL is just as organized as your favorite library – four neat sections, each with its own distinctive scope. First, we have Global permissions, which hold dominion over all databases on a MySQL server. These are like the universal library cards that let you wander freely through all the aisles, no matter the genre.

Then, we have Database permissions. These only apply to particular databases, much like a pass that grants access to a specific library department. Following closely are Table permissions, which apply to specific tables within a database. Think of them as the keys that unlock access to individual book series within a genre.

Finally, we have Column permissions that apply to particular columns within a table. These are your detailed reading permissions, akin to having a special bookmark that lets you read particular chapters in a book.

Comprehending these distinct categories is a fundamental step in your MySQL journey. It’s like having a library map in hand – once you know where everything is, you can easily navigate the vast world of information. So, as you continue your MySQL adventure, keep this knowledge in your back pocket. With it, you’ll be better equipped to grant and revoke permissions efficiently, maintaining the harmony and security of your database.

Allocating and Revoking MySQL Permissions

The process of dishing out and pulling back permissions in MySQL is like playing the role of a generous host, welcoming guests and ushering them out gracefully. You, as the MySQL host, employ two primary tools: the GRANT and REVOKE statements.

To illustrate, let’s say you’re hosting an event – your database – and you have a guest – a user. You want to grant this guest permission to view (SELECT) a particular section of the event – a specific database table. You’d simply hand them an invite using the GRANT statement, written like this: GRANT SELECT ON database.table TO ‘user’@’host’.

It’s as if you’re saying, “Come right in, dear guest. Please, feel free to enjoy the view of this specific area.”

However, let’s say the event is winding down, and it’s time to usher guests out. To gracefully withdraw the user’s access, you’d use the REVOKE statement, in a similar syntax to the GRANT. But don’t worry, it’s not as harsh as it sounds. You’re simply saying, “Thank you for coming. It’s time to say our goodbyes now.”

Remember, though, in this grand event of MySQL, only the hosts holding the special GRANT OPTION permission can extend or withdraw these invites. It’s like being the master of ceremonies, controlling the flow of the event and ensuring everything runs smoothly and securely.

So, as you navigate your role as a MySQL host, keep this in mind. Your use of the GRANT and REVOKE statements are powerful tools in your arsenal, allowing you to maintain the integrity, security, and fluidity of your MySQL event.

Introduction to Roles in MySQL

Picture MySQL roles as special clubs within the vast landscape of your database. These clubs are essentially collections of permissions or privileges that have been conveniently given a name. Rather than needing to hand out individual permissions to each user, a database administrator can simply invite users to join a club. Upon joining, the user is automatically bestowed with all the permissions associated with that club. Imagine the convenience and ease, especially when you’re dealing with a bustling database filled with numerous users.

The beauty of these roles doesn’t stop there. They provide a streamlined approach to permission management, eliminating the hassle of individually tweaking each user’s access rights. This doesn’t just save time and effort; it also reduces the risk of errors, enhancing your database’s overall security and integrity.

In the next sections, we’ll delve into the specifics of creating these clubs, adding members, and even linking clubs together in a fascinating phenomenon known as role inheritance. So, buckle up and prepare to dive deeper into the world of MySQL roles!

Creating and Assigning Roles in MySQL

Picture yourself as an event organizer, forming exclusive clubs within your grand MySQL event. Each club, or role, is a bundle of permissions you’ve conveniently grouped and given a name. Creating these clubs is as simple as uttering the magic words: CREATE ROLE. Voila, a new role is born, waiting for you to breathe life into it.

Next, it’s time to assign permissions to your newly formed role, similar to defining the theme of your club. You’re no stranger to the GRANT statement; it’s the same tool you use when assigning permissions to users. Now, you’re using it to give your role its defining features, its privileges.

Imagine saying: “GRANT SELECT, UPDATE ON database.* TO ‘role’;” It’s as if you’re shaping the club’s theme, announcing, “Members of this club can view and edit any table in the database.” The power of shaping your club’s privileges is at your fingertips.

But what’s a club without members, right? To invite a user to join your club, or to assign a role to a user, you employ the SET ROLE statement. Picture extending a golden ticket to a user, with words that read: “SET ROLE ‘role’ TO ‘user’@’host’;” In essence, you’re declaring, “Welcome to the club! Enjoy all the privileges that come with membership.”

However, remember that joining the club doesn’t mean immediate access to its perks. The privileges only become active in a user’s session after you, the grand organizer, have activated them with the SET ROLE command. Think of it as a special handshake, a rite of passage that needs to be completed before a new member can enjoy the benefits of the club.

With these tools at your disposal, forming and managing clubs in your MySQL event can be an enjoyable and efficient process. Through mastering the creation and assignment of roles, you’re not just organizing a grand event; you’re crafting an engaging and secure MySQL experience for all users.

Dealing with Role Inheritance

Imagine this – in the grand social event of your MySQL database, you’ve got an array of exclusive clubs (roles) brimming with their unique privileges (permissions). What if you could make these clubs even more dynamic? This is where the fascinating concept of role inheritance comes into play.

In MySQL, roles aren’t just standalone entities; they can form interconnected networks, passing down privileges from one role to another, much like a family inheritance. When you grant role A to role B, it’s like role A passing down a treasured heirloom – its set of permissions – to role B. This way, role B not only retains its unique permissions but also inherits the privileges of role A. It’s akin to one club inheriting the theme, or privileges, of another.

This feature is particularly handy when you want overlapping permissions among roles. For example, you might have a ‘Readers’ club and an ‘Editors’ club, and you want the ‘Editors’ to also have reading privileges. Instead of manually adding the reading permissions to the ‘Editors’ club, you can simply establish role inheritance, and voila – the ‘Editors’ inherit the reading privileges from the ‘Readers’.

Creating this inheritance is as easy as using the GRANT statement, much like an official announcement of the inheritance. It’s as if you’re declaring, “Dear ‘Editors’ club, you are now the proud inheritors of the ‘Readers’ privileges. Enjoy the expanded scope of your club.”

Remember though, as fascinating as role inheritance may be, it also requires careful management. After all, with great power comes great responsibility. So, as you traverse the intriguing landscape of MySQL role inheritance, bear in mind the importance of meticulous planning and strategic implementation. By mastering role inheritance, you’re not just managing your database; you’re weaving intricate networks of roles, crafting a dynamic and secure MySQL ecosystem.

Deleting Roles and Removing Permissions

Just as every grand event has its conclusion, so too does every role in your MySQL event have its potential curtain call. You, the grand organizer, have the power to dissolve a club, or delete a role, using the DROP ROLE statement. Think of it as a grand, albeit somber, closing ceremony for the club, an end to its tenure in the vast MySQL landscape.

Meanwhile, you might encounter times when you need to reshape your club, perhaps to suit the changing dynamics of your database event. This may involve revoking certain permissions from a role. It’s like changing the theme of the club, removing specific activities that no longer suit its nature. For this, you have the REVOKE statement at your disposal, a tool that enables you to gracefully remove privileges from a role.

Imagine saying: “REVOKE UPDATE ON database.* FROM ‘role’;” It’s as if you’re announcing a change in the club’s theme, declaring, “The club’s focus is no longer on editing any table in the database.” The power of reshaping your club’s privileges is again at your fingertips.

However, remember that in this grand MySQL event, every action has its consequences. Therefore, any changes to roles and permissions should be carefully thought through. Just as you wouldn’t want uninvited guests causing chaos at your event, you wouldn’t want unauthorized access in your database. So, ensure that your actions always align with your database security requirements.

Just-in-time access permission management

The Apono Solution

Apono provides plug-and-play authorization workflows so companies don’t need to start building them from scratch. Apono serves as the intermediary that connects identities with entitlements, enabling access on a just-in-time, temporary basis. Apono’s privilege authorization capability provides a reliable and streamlined approach to permission management and mitigates the consequences of a MySQL permissions-related breach, without compromising user experience and productivity.

Without Apono, companies need to create their own users and their own policies for these. But with Apono, they don’t need to do that. They can ask for what they need, and it’s automatically granted. How? When someone asks permission for a user, Apono goes inside MySQL, creating a policy that will fit those needs, and giving the requestor a user. Then that user can be utilized to connect the model when the authentication is turned off.

The Ultimate Guide to Granting Permissions and Roles in MongoDB

Do you want to establish a secure database environment in MongoDB? User permissions are paramount to ensure data protection, limit data access, and secure user operations. Our ultimate guide will show you how to create users and grant permissions in MongoDB, making your database management tasks easier and more efficient.

Understanding MongoDB and User Management

MongoDB, a powerful and flexible NoSQL database, utilizes JSON-like documents for data storage, which enhances its efficiency and scalability. The key to fully unleashing its power lies in effective management, particularly in the realm of user management. This encompasses the creation of users and the assignment of roles. The roles are essentially the tasks and operations a user can perform within the database. The beauty of MongoDB is in this flexibility; you can tailor your user management strategy to fit your unique needs, ensuring your data remains safe and secure.

Creating users and assigning them appropriate roles is the first line of defense against unauthorized access and potential data leaks. It’s like a customized lock on a door, only allowing access to those with the right key. MongoDB takes this security a step further with the concept of roles. Think of roles as different keys with different levels of access. Some keys might only open the front door, while others might also unlock the office or the supply room. The same principle applies to user roles in MongoDB; some users may only read data, while others may have write or administrative access.

Ultimately, understanding and effectively implementing user management in MongoDB isn’t just about securing your data—it’s also about maximizing efficiency. By granting appropriate permissions, you ensure that each user can perform their duties without unnecessary access that could pose a security risk. So, step into the world of MongoDB user management, and discover how you can secure your database while streamlining operations.

Setting up MongoDB for User Creation

Before diving into the creation of users, it’s critical to ensure your MongoDB environment is primed for the task. The first step in this process involves installing MongoDB on your system. Follow the official guidelines provided by MongoDB for your specific operating system to ensure a smooth and successful installation.

With MongoDB installed, you’re ready to activate the Mongo shell. Consider this shell as your interactive command center for MongoDB. It’s essentially a JavaScript interface, giving you the freedom to connect with and operate your MongoDB instance directly.

Now, here’s where things get a bit more technical, but don’t worry, we’ll guide you through it. To enable access control, you’ll need to fire up the ‘mongod’ process with a specific ‘–auth’ option. This step is crucial for ensuring secure connections as it enforces authentication across all your MongoDB interactions. So, think of this ‘–auth’ option as the robust security guard standing by your MongoDB door, ensuring every interaction is validated and authorized.

To put it simply, setting up MongoDB for user creation is a straightforward process. However, each step is vital and contributes to the overall security and functionality of your MongoDB instance. It’s all about laying a secure and effective foundation, one that enables you to explore the world of user creation, roles, and permissions with ease and confidence. So go ahead, set up your MongoDB and get ready to dive into the exciting world of MongoDB user management!

How to Create Users in MongoDB

Ready to create your first user in MongoDB? Excellent! It’s a smooth process that you’ll master in no time. You’re about to learn the ‘db.createUser()’ method, which is your handy tool for this task. Think of it as your welcoming committee, always ready to introduce new users into your MongoDB environment.

Let’s jump in! This method requires a document. Not just any document, but one that holds all the essential details of the new user – the username, password, and roles. It’s like a passport, providing identification and defining what the user is allowed to do within your database.

Here’s something you should know. When it comes to storing passwords, MongoDB uses SCRAM (Salted Challenge Response Authentication Mechanism). You might think, “That sounds complicated.” Not to worry! Essentially, it’s an added layer of protection that shields passwords from unauthorized access. It’s like a secret handshake, only those who know it can gain access.

Remember, creating users is about more than adding new members to your MongoDB club. It’s about defining who gets to do what, and how. Every detail matters, from the username to the roles assigned. So, think carefully about these decisions, as they play a significant role in securing your data and maintaining an efficient MongoDB environment.

As you continue to explore MongoDB, you’ll realize that creating users is just the beginning of the journey. It’s the first step towards crafting a secure, efficient, and tailored database experience. So, gear up and get ready to dive deeper. Your MongoDB adventure is just getting started!

An Overview of MongoDB Roles and Privileges

Roles in MongoDB are like superpowers that we assign to our users, determining the actions they are allowed to perform within our database realm. Each MongoDB user can be given one or several of these superpowers, providing the flexibility to customize access levels based on specific user needs. The built-in roles include some pretty handy abilities such as ‘read’, ‘readWrite’, and ‘dbAdmin’. Each of these roles carries a bundle of privileges, which are specific actions that the role can perform on a particular resource.

But what if your database needs are more unique, and the built-in roles just don’t cut it? MongoDB has you covered! You can create custom roles that cater to your exact requirements. Consider these custom roles as your personalized superpowers, designed and created to accomplish your specific database missions.

Remember, roles and privileges are not just about controlling user access, but also about streamlining your database operations. Assigning appropriate roles means each user has the exact permissions they need to do their job, nothing more, nothing less. It’s about finding that sweet spot between security and efficiency, and that’s where MongoDB roles and privileges truly shine!

So, step into your role as the MongoDB superhero, assign your users their superpowers, and create a database environment that’s not just secure, but also optimally efficient!

Granting Permissions to MongoDB Users

It’s now time to confer your carefully crafted roles onto your MongoDB users, granting them the specific permissions they need to navigate your database effectively. This stage in the process utilizes the method ‘db.grantRolesToUser()’, essentially the master keymaker in your MongoDB instance. But remember, this method should be invoked in the admin database.

Imagine it as the grand ceremony where you bestow your users with their unique database superpowers. You decide who gets to read data, who can modify it, and who has administrative privileges. And guess what? You can easily alter these permissions later if need be. MongoDB remains flexible, allowing you to adapt your users’ roles as your database needs evolve.

But what if a user no longer requires a particular role? Perhaps they’ve shifted positions, or their job responsibilities have changed? Not a problem! The method ‘db.revokeRolesFromUser()’ is your go-to tool for such situations. It’s like the polite bouncer at the database club, ensuring those without the necessary permissions are gently guided away from restricted areas.

Remember, granting permissions is not a set-it-and-forget-it affair. It’s an ongoing process that adapts with your changing data requirements. It’s about fine-tuning the level of access each user needs to perform their job effectively while keeping your database environment secure.

So, get started with ‘db.grantRolesToUser()’ and ‘db.revokeRolesFromUser()’. These methods are your powerful allies in managing your MongoDB permissions, allowing you to craft a secure and efficient database environment that perfectly suits your needs.

Advanced User Management and Permission Controls

Ready for a deep dive into the advanced capabilities of MongoDB’s user management? Let’s go beyond the basics and explore the more sophisticated features that cater to complex requirements. Buckle up and get ready to take your MongoDB skills to the next level!

Ever wondered if you could assign a role only on a specific database? With MongoDB, you can do precisely that! You have the flexibility to grant a role that is strictly confined to a particular database, ensuring a higher level of access control.

Additionally, MongoDB’s dynamic environment allows you to create roles that inherit privileges from other roles. Think of it as passing the torch, where a new role can step in and perform the tasks of an existing role, along with its unique functions.

And there’s more! MongoDB lets you assign a role to a user that is applicable only during a specific session. This feature is especially beneficial when temporary access is required, such as during training or for a specific project. The role automatically expires once the session ends, minimizing potential security risks.

Did we mention the creation of views? MongoDB lets you define views, which are essentially read-only windows into your data. This feature allows you to expose a subset of your data to a user, providing an added layer of permission control. It’s like having a viewing deck, offering a limited yet valuable perspective of your data landscape.

From granting roles on specific databases to creating session-specific roles and defining views, MongoDB’s advanced user management features offer an array of tools to fine-tune your permission controls. Harness these capabilities to create a database environment that’s not just secure, but also highly tailored to your complex requirements. Your MongoDB adventure continues, and it just keeps getting better!

Common Mistakes and Best Practices in MongoDB User and Permission Management

Venturing into the world of MongoDB user management can sometimes feel like navigating a maze. One wrong turn and you might find yourself facing security pitfalls. But fear not! We’re here to guide you through common mistakes and arm you with best practices to keep your database environment secure and efficient.

Are you remembering to enable authentication in MongoDB? Neglecting this step is like leaving your front door wide open, inviting anyone to stroll in. Authentication is your gatekeeper, ensuring only those with the right credentials gain entry. So, never skip this crucial defense layer.

And how about those passwords? Are they weak and easily guessable? Remember, your password is like a secret code, and it needs to be strong to keep intruders at bay. Opt for robust passwords that are hard to crack to fortify your MongoDB security.

Perhaps one of the most common mistakes is granting excess privileges. It’s like giving away too many keys to your house. Adhere to the principle of least privilege, ensuring users have just the right level of access to perform their duties. Excessive privileges not only pose a security risk but also disrupt your database’s efficiency.

Finally, don’t fall into the trap of set-it-and-forget-it when it comes to user permissions. Your MongoDB environment isn’t static, and neither should your user permissions be. Make it a point to regularly audit your user permissions, fine-tuning them to suit evolving needs.

Avoiding these common mistakes and implementing best practices such as using Apono will set you on the path to a secure and efficient MongoDB experience. So gear up, and navigate your MongoDB user management journey with confidence!

Check out our article about Just-in-Time Access to Databases. 

Just-in-time access permission management

The Role of Just-in-Time Self-Service Access in Privileged Access Management

Privileged Access Management (PAM) plays a crucial role in the security of any organization. Within PAM, the aspect of just-in-time self-service access has become increasingly important. By providing just-in-time access (that can be self-served) to essential resources, companies can significantly improve security measures while maintaining flexibility. In this post, we’ll delve into the role of self-service in PAM and its importance in today’s fast-paced digital environment.

Defining PAM and Self-Service Just-in-Time Access Management

Privileged Access Management, or PAM for short, serves as the gatekeeper of your organization’s most sensitive data and systems. Think of PAM like a security detail, overseeing who can access your organization’s “VIP area” – your critical systems and data. But it doesn’t just control entry; it also monitors and manages the extent of the privileges granted, providing a robust layer of security that can thwart potential data breaches.    

Within this PAM security strategy, the concept of self-service access plays a pivotal role. Understanding these two concepts – PAM and just-in-time self-service access – can be a game-changer for your organization’s security strategy. Together, they establish a solid defense against unauthorized access, making sure your company’s precious digital assets stay protected while your team stays productive. So, let’s delve a bit deeper and unravel the important role that self-service access plays within Privileged Access Management.

The Concept of Just-in-Time Self-Service Access

Picture this scenario: access to your organization’s vital resources isn’t permanently open but granted only at the precise moment it’s needed and promptly rescinded as soon as the task is completed. This dynamic form of access control is what we call just-in-time access. It’s like having a personal security guard who doesn’t just hold the keys but knows exactly when to unlock the door and when to lock it again, keeping unauthorized users at bay.

This strategy hinges on providing timely access rights to crucial systems and data, thereby significantly narrowing the window of opportunity for potential cyber threats. It’s a well-calculated move aimed at minimizing the risk of unauthorized access and privilege misuse.

But the beauty of just-in-time self-service access doesn’t stop at risk reduction. It also helps in creating a more efficient workflow. Rather than having to navigate through a labyrinth of permissions and approvals, users receive access only to what they need, exactly when they need it. This removes unnecessary clutter, streamlines operations, and keeps the focus on the task at hand.

In essence, efficient just-in-time access is all about striking a delicate balance between accessibility and security, offering a smart way to give necessary privileges without exposing your systems and data to undue risk. This innovative approach is rapidly reshaping the landscape of Privileged Access Management, setting new standards for access control in our increasingly digital world. 

Importance of Just-in-Time Self-Service Access

Just-in-time self-service access is no longer just a luxury, but a critical component of a sound security strategy, serving several key functions. Firstly, it fosters the adoption of a zero-trust security framework. This principle demands the verification of every access request, regardless of its source, effectively mitigating the risk of internal threats. Simply put, it trusts no one and always verifies, putting your security front and center.

Secondly, it minimizes your exposure to potential attacks. By ensuring that privileged rights are not continuously active, it reduces the likelihood of these permissions being misused or exploited, shrinking the potential attack surface considerably. You are, in essence, giving potential cyber threats less room to maneuver.

Thirdly, it adds an additional layer of accountability to your organization’s operations. Just-in-time self-service access leaves an indelible digital footprint, offering a transparent audit trail of who accessed what, when, and for how long. This not only fosters a sense of responsibility among users but also aids in tracking and addressing potential security incidents effectively.

Moreover, just-in-time self-service access is a strategic move towards a more efficient operational structure. It eliminates the need for broad and persistent access rights, allowing users to focus on their immediate tasks at hand with the necessary permissions. By embracing just-in-time self-service access, organizations can strike a critical balance between maintaining rigorous security and fostering operational efficiency, all while driving a security-conscious culture within the workforce.

Implementing Just-in-Time Self-Service Access in PAM

Making just-in-time self-service access an integral part of your PAM strategy involves more than just flipping a switch. The first step in this transformation revolves around creating protocols for access requests to be made on an as-needed basis. This is a departure from traditional approaches where permissions are granted en masse and for extended durations. By embracing a dynamic, need-based request model, you are fortifying your organization’s defenses.

Next, it’s about defining the workflow for these requests. You’ll need to design an approval process that’s nimble, yet stringent. It should be fast enough to not hinder business operations but thorough enough to ensure every access is absolutely necessary. This step often involves key decision-makers and stakeholders, so having their buy-in is vital.

Where just-in-time really shines is in the automation of access provisioning and de-provisioning. Implementing automated workflows takes the grunt work out of access management and makes it a breeze. It not only speeds up the process but also eliminates human error, further bolstering security.

Finally, the success of this transition hinges on choosing the right PAM solution. You need a system that not only supports self-service access but is built for it. It should allow for seamless integration of just-in-time access principles, ensuring that the move doesn’t disrupt existing processes.

Remember, implementing just-in-time self-service access isn’t just about security; it’s about creating a more streamlined and efficient way of working. A well-implemented strategy can turn your PAM system from a gatekeeper into a facilitator, ushering in a new era of secure, efficient access management.

Enhancing Security with Just-in-Time Self-Service Access

When it comes to bolstering the security of privileged accounts, just-in-time self-service access plays a starring role. Imagine having a security system that gives you absolute control over who can access your organization’s crucial systems and data, and when. It’s not just about allowing access; it’s about defining the timeframe for that access. This is the power that just-in-time self-service access brings to your cybersecurity strategy.

Such a security approach makes it harder for both internal and external threats to find a foothold. With just-in-time access, you’re not just limiting the access window; you’re also ensuring that every privilege granted is being used responsibly and for the right purpose.

The beauty of this access strategy is not merely limited to its ability to fend off cyber threats. It also promotes a culture of security consciousness within your organization. When users are made aware that their access rights are time-bound and task-specific, they are likely to be more cautious and judicious in their usage.

This proactive approach to privileged access management is not about creating barriers, but rather about forging smarter paths to essential resources. It champions the principle of minimum privilege, where users get exactly what they need to complete their tasks and nothing more. It’s an approach that not only keeps your systems and data secure but also encourages responsible user behavior. By integrating just-in-time self-service access into your PAM strategy, you’re cultivating a security-first mindset across your organization, a move that will pay dividends in your ongoing battle against cyber threats.

Future of Privileged Access Management

As we advance into this future, organizations must stay ahead of the curve, harnessing innovative technologies such as Apono to reinforce their PAM strategies. By doing so, they’ll not only secure their critical assets but also create a more efficient, streamlined workflow, driving productivity without compromising security. In the age of digital transformation, the future of PAM is smart, agile, and excitingly within reach.

Just-in-time access permission management
privileged access

Zero-Standing Privileges: A Game Changer for Database Security

Achieving a zero-standing privileged environment is the most secure way to manage access to your databases.  This concept revolves around minimizing or altogether eliminating standing privileges, ensuring that users only acquire elevated access when absolutely necessary. This proactive security model is particularly crucial in safeguarding sensitive data housed within databases, as it mitigates the risk of unauthorized access, reduces the attack surface, and fortifies overall cybersecurity.

Understanding the Concept of Zero-Standing Privileges

In a traditional setup, standing privileges, also known as persistent or static privileges, grant users and systems continuous elevated access rights. This persistent elevation creates a vulnerability, as any compromise of these privileges can result in unrestricted access to critical databases. By transitioning to a zero-standing privileged environment, organizations adopt a more dynamic and risk-mitigating strategy.

Just-in Time Access

At its core, zero-standing privileges operate on a “just-in-time” model. This approach upends the antiquated method of perpetually assigning system privileges. Traditionally, an employee would receive access to certain systems or databases indefinitely, potentially opening up avenues for misuse or unnecessary exposure. Zero-standing privileges challenge this status quo, providing privileges only when and where they are truly needed. Imagine it like a tailor-made suit, fit perfectly for each individual task.

Once the task is completed, the suit is taken off, and the privileges revoked. This process minimizes exposure, curtails unnecessary access, and ultimately, fortifies your database security. It’s a game of minimizing risk by reducing the attack surface. By shrinking the playground for potential threats, we inherently boost our defenses. That’s the essence of zero-standing privileges.

Principle of Least Privilege

Additionally, implementing the principle of least privilege (PoLP) is integral to achieving a zero-standing privileged environment. This means users, applications, and processes are granted only the minimum access rights required to fulfill their tasks. By adhering strictly to the principle of least privilege, organizations can curtail the risk of unauthorized access and reduce the likelihood of malicious activities.

Importance of Database Security

Database security is of paramount importance to organizations worldwide, as databases hold critical and sensitive data. One potent strategy that has gained traction in recent years is the use of zero-standing privileges. This paradigm-shifting approach has become a game-changer for database security. In this blog, we will delve into the concept of zero-standing privileges, its importance, and how it is transforming the landscape of database security.

Preventing Unnecessary Access

Handing out access privileges willy-nilly is akin to leaving your front door wide open. It invites unnecessary risk and potentially serious consequences, such as data breaches and corruption of system integrity. This is where zero-standing privileges truly shine. It’s akin to having a bouncer at the door of your database, letting only the right people in at the right time and promptly showing them the exit once their task is complete.

By following this “need-to-know” basis of access, we’re substantially reducing opportunities for unauthorized access. No longer do we have to worry about accidental alterations or deletions of data, as access is tightly controlled and only given when it’s genuinely required. In the grand chess game of cybersecurity, zero-standing privileges could very well be your next strategic move, a move that provides heightened security by diminishing unnecessary access.

Regulatory Compliance and Zero-Standing Privileges

When it comes to navigating the maze of regulatory frameworks, such as the General Data Protection Regulation (GDPR) or the Health Insurance Portability and Accountability Act (HIPAA), organizations face the daunting challenge of maintaining limited data access. The answer to this intricate puzzle lies within the principle of zero-standing privileges. This revolutionary approach is in perfect harmony with these stringent regulatory guidelines, enabling businesses to remain on the right side of compliance.

A significant aspect of these audits is having resilient, traceable, and verifiable access controls, elements that zero-standing privileges bring to the table. In this data-driven era, where regulations have become increasingly rigorous, the zero-standing privileges model serves as a guiding star, helping organizations navigate the compliance landscape. By embracing this method, businesses can ensure their practices are aligned with regulatory demands, paving the way for a smoother auditing process and fostering an environment of trust and compliance. In essence, zero-standing privileges not only fortify your database security but also ensure your organization sails smoothly through the sea of regulatory compliance.

Streamlining IT Operations with Zero-Standing Privileges

Imagine a smooth and streamlined IT operation, unencumbered by the constant tussle of access rights management. This is precisely the advantage that zero-standing privileges bring to the table. Instead of wrestling with an intricate web of permanent permissions, IT teams can instead focus on temporary, just-in-time privileges. This approach vastly reduces the complexity and administrative load, allowing IT teams to breathe a sigh of relief.

Think of it like a finely-tuned orchestra where every privilege granted is a note played at the right time and for the correct duration. This finely-tuned performance also extends to audits. With zero-standing privileges, every permission granted has a clear and justifiable reason, making the audit process not only more manageable but also more transparent. This transparency paves the way for increased operational efficiency, as time previously spent on managing and justifying standing privileges can now be allocated to other pressing tasks.

Ultimately, zero-standing privileges can transform the labyrinth of permissions management into a straight, clear path. It’s about turning chaos into order, and confusion into clarity. It’s about leveraging the power of just-in-time access to enhance IT operations. Welcome to the era of zero-standing privileges, where managing IT operations becomes less about firefighting and more about strategic planning and execution.

The Future of Database Security: Adopting Zero-Standing Privileges

Technologies such as Privileged Access Management (PAM) solutions including Apono play a crucial role in enforcing and managing a zero-standing privileged environment. These tools enable organizations to monitor, control, and audit privileged access, ensuring that privileges are granted judiciously and only when necessary. These solutions also facilitate the enforcement of policies, periodic reviews, and the automatic revocation of unnecessary privileges.

Check out our Buyer’s Guide to learn more when evaluating tools to use. 

Permissions in MySQL

6 Permissions Management Use Cases

After polling many of our clients, we put together this list of the top 6 most-seen permissions management use cases. In addition, we show how a permissions management solution benefits each case.

1. JIT Provisioning in Permissions Management

JIT provisioning automates the process of generating and updating user accounts. Instead of proactive account creation, user accounts come into play when users initiate their first login attempts to applications, provided they have the necessary authorization. 

Permissions Management

2. Automated Least-Privilege Access

Automating the enforcement of least-privilege access brings numerous advantages to companies, such as heightened security, heightened operational efficiency, and improved compliance.

By automating the process of granting and revoking access, organizations can drastically diminish the risk of unauthorized privileges, ensuring that employees possess only the resources essential for their specific roles. This minimizes the attack surface and reduces the potential consequences of security incidents.

Additionally, automation eliminates the necessity for laborious manual procedures, enabling employees to swiftly acquire the necessary access. By streamlining the processes of access requests, approvals, and provisioning, companies can enhance operational efficiency while alleviating the administrative workload on IT and security teams.

3. Incident Management via ChatOps

ChatOps bridges the gap between human interaction and automated processes, resulting in a powerful tool that empowers modern teams. It’s a game-changer in DevOps and beyond, boosting efficiency, productivity, and collaboration. When used for just-in-time access to sensitive resources, it becomes even more of a necessity for busy dev teams.  

The connection between effective communication and successful incident management is no mystery. Teams that excel in communication and collaboration not only address incidents more swiftly but also maintain satisfaction among both internal teams and external users. 

Moreover, their adeptness in postmortems aids in pinpointing underlying issues and proactively preventing future incidents. It’s no wonder that ChatOps has seamlessly integrated into the processes of numerous incident management teams.

4. Automated Self-Service Access Requests 

In legacy environments, data or resource access requests often happen in emails, phone calls, or in an IT service management ticketing system. In a modern identity implementation, an  Identity Management (IDM) tool or process that allows self-service access requests makes security and compliance easier through consistent enforcement and tracking of digital identities across the IT ecosystem.

5. Break-glass Scenarios

When implementing an access management solution such as a Privileged Access Management (PAM) tool, businesses frequently find the need for a contingency access capability. This ensures that users can still access their systems in emergencies, particularly when the deployed PAM tool is unavailable for regular access provisioning.

6. Complying with Regulations for Data Access Control

In the contemporary global business landscape, enterprises encounter formidable challenges such as swiftly evolving technology, the imperative of digital transformation, and a growing array of industry-specific regulations pertaining to data security and privacy. Non-compliance with these regulations may result in substantial fines, penalties, and erosion of customer trust.

Comply with SOX, SOC2, ISO27001, and other relevant standards by verifying and demonstrating that solely authorized individuals access the minimal necessary sensitive data.

Privileged Access Governance
Just-in-time access permission management

Automating Least-Privilege Access

Automating the enforcement of least-privilege access brings numerous advantages to companies, encompassing heightened security, heightened operational efficiency, and improved compliance.

By automating the process of granting and revoking access, organizations can drastically diminish the risk of unauthorized privileges, ensuring that employees possess only the resources essential for their specific roles. This minimizes the attack surface and reduces the potential consequences of security incidents.

Additionally, automation eliminates the necessity for laborious manual procedures, enabling employees to swiftly acquire the necessary access. By streamlining the processes of access requests, approvals, and provisioning, companies can enhance operational efficiency while alleviating the administrative workload on IT and security teams.

Problems with Manual Provisioning

In many organizations, IT and security teams contend with constrained resources and a backlog of responsibilities. Assigning individuals to manually evaluate temporary elevation requests is not the most efficient allocation of skilled resources and can lead to natural delays. Coupled with the stress and frustration experienced by requestors justifying their needs and waiting for permissions, this results in a recurrent, stressful situation that does not align with business requirements.

Achieving Least-Privilege Access in the Cloud

A centralized automated system for requesting and granting permissions, monitoring their utilization, and ultimately revoking privileges can be immensely helpful. An automated Just-In-Time (JIT) mechanism can bridge gaps created by manual processes and reduce friction and administrative overhead. Automated monitoring and auditing of JIT access prove valuable in verifying the absence of inadvertent misconfigurations and facilitating rapid incident investigations when necessary.

The following are three action items every organization should follow:

1. Utilize Self-Service Access

Implementing a self-service approach to access management is pivotal in empowering the workforce and diminishing reliance on IT and security teams. By offering employees a user-friendly self-service portal, companies can facilitate access requests to cloud resources, applications, and data as needed.

2. Implement Flexible No-Code Workflows

In access management, it is crucial to distinguish between privileged access and standard access. Privileged access pertains to elevated permissions granted to individuals necessitating administrative or special privileges for their duties, while standard access relates to regular user access for routine tasks. Automating least privilege access empowers organizations to differentiate between these access types and enforce more stringent controls on privileged accounts. By automating the provisioning and revocation of privileged access, companies can curtail the risk of misuse, insider threats, and unauthorized activities.

Flexible no-code workflows play a pivotal role in automating least-privilege access. These workflows enable organizations to define customizable approval sets based on various criteria, such as data sensitivity, identity provider (IdP) group membership, access duration, on-call schedules, and more.

By tailoring approval workflows to align with the distinct needs of various teams, projects, and roles, organizations can strike a balance between security and operational efficiency. This approach guarantees that access is granted based on appropriate checks and balances while accommodating the specific requirements and urgency of different access requests.

Least-Privilege Access

3. Enable Direct API Capabilities for Granular Provisioning

Fine-grained access control forms a cornerstone of least-privilege access, ensuring that employees only possess the permissions required to fulfill their specific responsibilities. Automating fine-grained access empowers organizations to define and enforce access permissions based on roles, responsibilities, and project prerequisites. This precision significantly reduces the potential impact of security incidents, as access is confined to the exact resources and actions required, minimizing the scope for lateral movement or unauthorized data exposure.

To achieve fine-grained permissions and efficient access provisioning, it is imperative to have direct API capabilities. APIs facilitate seamless integration with existing systems, applications, and identity providers, enabling real-time access provisioning and revocation.

Real-time provisioning of access enables JIT access, a crucial component of automated least-privilege access. Instead of granting continuous access to resources, JIT access authorizes permissions for a limited timeframe, precisely when needed. This approach minimizes the attack surface by narrowing the window of opportunity for potential threats. Through the implementation of JIT access, organizations can bolster security and guarantee that employees have access only when essential, mitigating the risk of unauthorized use or data exposure.

By harnessing APIs, organizations can automate the complete access management process, from request submission to approval, provisioning, and auditing. This high level of automation simplifies procedures for IT and security teams while ensuring accurate and timely access control.

About Apono

Apono is a leading provider of least-privilege access management solutions that enhance access control with dynamic mechanisms. With Apono’s platform, organizations can leverage Just-In-Time (JIT) access and Attribute-Based Access Control (ABAC) functionalities to achieve a more flexible and adaptable access management approach.

Privileged Access Governance