5 Steps for Moving to the AWS Identity Center

Ofir Stein
August 24, 2023

Table of Contents
For many organizations using AWS, the challenge of maintaining a least-privilege posture in their cloud operations is becoming increasingly difficult. This difficulty stems from the need to build access systems from scratch, remodel legacy tools, and prepare for future cloud service add-ons.
In addition, organizations are struggling with creating and managing AWS IAM users and roles, especially when their team grows and needs more accounts. This is why AWS created the AWS Identity Center (formerly known as AWS SSO). It can act as a standalone identity provider for logging into AWS, or it can connect with existing providers, such as Okta and Google.
In this post, we’ll be discussing the methods available for setting up and managing identities in the AWS IAM Identity Center—including the 5 steps everyone must do.
Why Use the AWS IAM Identity Center?
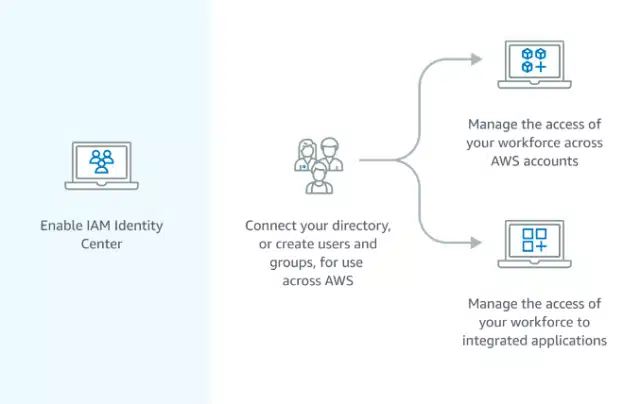
The IAM Identity Center, which follows AWS Single Sign-On, is a cloud service that allows you to grant your users access to the AWS Portal or CLI across multiple AWS accounts. The name change to IAM Identity Center highlights its foundation in IAM while showcasing its extended functionalities and endorsed role. By default, AWS IAM Identity Center now provides a directory that you can use to create users, organize them in groups, and set permissions across those groups.
Through this platform, it’s possible to manage access to various AWS accounts and applications. This approach is recommended as the primary gateway to AWS, as it empowers you to select your preferred identity source for seamless integration across the AWS ecosystem. Moreover, it enhances your security posture by maintaining consistent permissions across different AWS accounts and applications.
For smaller organizations who need only one account, AWS IAM is a great choice, but for those big organizations or companies with multiple accounts, moving to the AWS Identity Center is the right choice.
Difficulties Managing Access in Traditional IAM
- Time-Consuming. You need to configure each and every user or role inside Amazon. And if there are two accounts, you need to go to the first one, map each role to Okta, then set up the permissions needed for each of them. After that you need to go to the second and repeat the process. For companies with more than 10 accounts, this is a tedious, time-consuming task prone to human errors.
- Static. The permissions are static, so once they are set, they are not changing. In order to make any permission adjustments for any user or role, you must go inside AWS and manually change the permissions for the specific accounts you want.
5 Steps Needed for Provisioning in the AWS Identity Center
1. Enabling the IAM Identity Center
When you set up an AWS account, you start with one primary sign-in identity, granting full access to all AWS services and resources within the account.
This identity is known as the AWS account root user and is accessible through the email address and password used during the account creation process. (However, it is strongly advised against using the root user for regular tasks. Instead, it is crucial to safeguard the root user credentials and reserve their use for tasks that specifically demand the root user’s privileges.) To begin, you need to sign in to the AWS Management Console as the account owner by choosing Root user and entering your AWS account email address. On the next page, enter your password.
| APONO TIPS 1. It’s important to safeguard your root user credentials. Don’t use the root user for your everyday tasks. Instead use them to perform the tasks that only the root user can perform. 2. Remember, the AWS identity center acts as an SSO portal to all the applications in the organization—not only AWS. |
2. Provisioning Users and Groups
In IAM Identity Center, you have the flexibility to create users and groups directly within the system or utilize existing users and groups from Active Directory or another external identity provider. However, before IAM Identity Center can grant access permissions to users and groups within an AWS account, it needs to be informed of their existence. Likewise, applications enabled by Identity Center can interact with users and groups that are known to IAM Identity Center. Provisioning in IAM Identity Center varies based on the identity source that you use.
3. Defining Permissions
In order to define the permissions and policies that govern what users have access to within an AWS account, you will need to go into the admin console and configure it all from there unless you use a tool such as Apono.
APONO TIPS
Keep in mind, with the AWS IAM Identity Center, it’s possible to reuse existing AWS IAM Identity Center policies
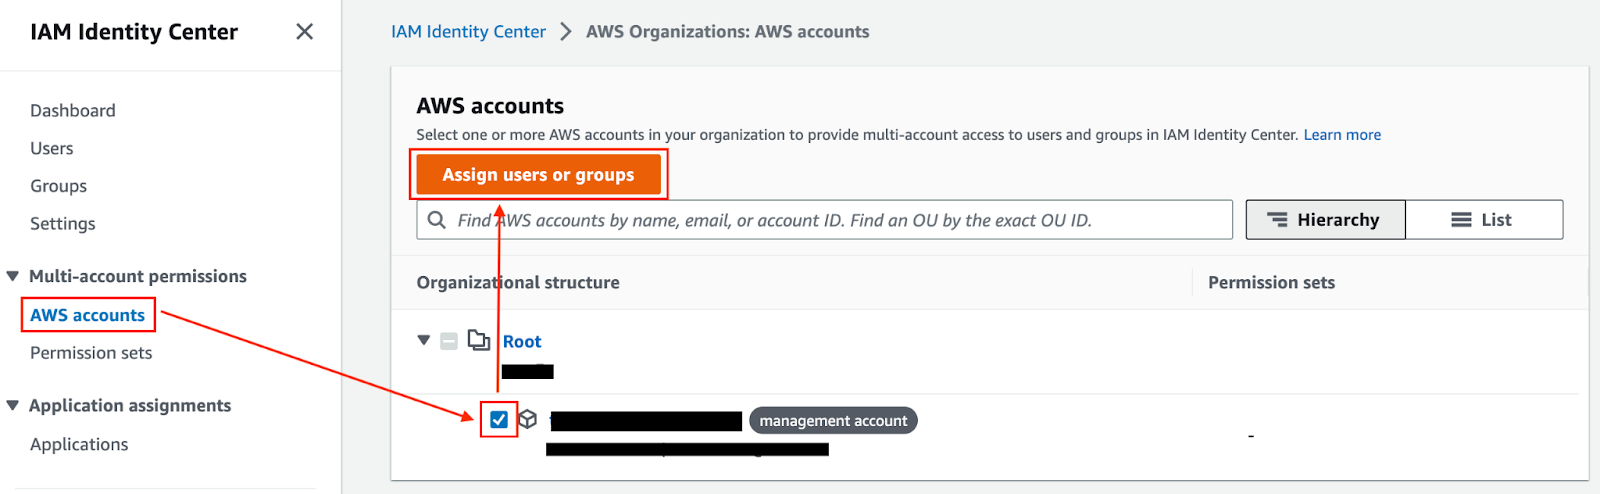
4. Assigning Access
In the Identity Center, permissions are administered through sets of permissions, which are essentially groupings of IAM policies. When a user or a group is assigned a permission set associated with an account, the Identity Center will automatically generate corresponding IAM roles within that account. These roles inherit policy configurations from the respective permission set. Furthermore, each role is equipped with a trust policy that ensures the role can only be assumed after the user has been authenticated by the federated identity provider.
5. Removing Access
One of the most important steps, though often neglected, is remembering to remove permissions once they aren’t needed anymore. This helps enforce the zero-principle security policy that states no one should have standing permissions.
AWS IAM Users are a crucial aspect of managing access and permissions within the AWS ecosystem. However, relying on long-term credentials can pose tons of risks. Utilizing AWS Organizations, AWS Identity Center, and identity federation can greatly improve the management of users and resources across multiple accounts.
By leveraging these tools and pairing them with permission management applications such as Apono, you can enhance security, streamline administration, and maintain compliance within your AWS infrastructure.
Apono integrates with AWS natively, which allows you to manage access to your S3 buckets, IAM roles and groups, EC2, EKS clusters, RDS instances and many more.
Some of the benefits of integrating AWS with Apono include the following:
- Automatic Deprovisioning – Eliminate the need of manually deprovisioning tasks with time-restricted access workflows.
- Reduction in Over Privileges – Discover existing privileges to AWS roles, groups and services to convert to on-demand access flows to reduce over-privileges.
- Self-Service Access – Empower your developers to gain self-servable access to AWS services, buckets, instances and more using Slack.
- Automated Approval Workflows – Create approval workflows to specific sensitive resources.
- Restricted Third Party Access – Grant third-party (customer or vendor) time-based access to specific S3 buckets, RDS or EC2 instances with MFA verification.
- Access Reviews – View a detailed access audit of who was granted access to which specific instances, buckets or other resources in AWS.
To avoid the tedious task of going into the AWS Identity Center admin console every time you need to grant or revoke access, it’s important to use a tool such as Apono. With Apono, users can request and reviewers can grant permissions—without leaving Slack.