How To: Create Users and Grant Permissions in MySQL

Ofir Stein
June 2, 2023
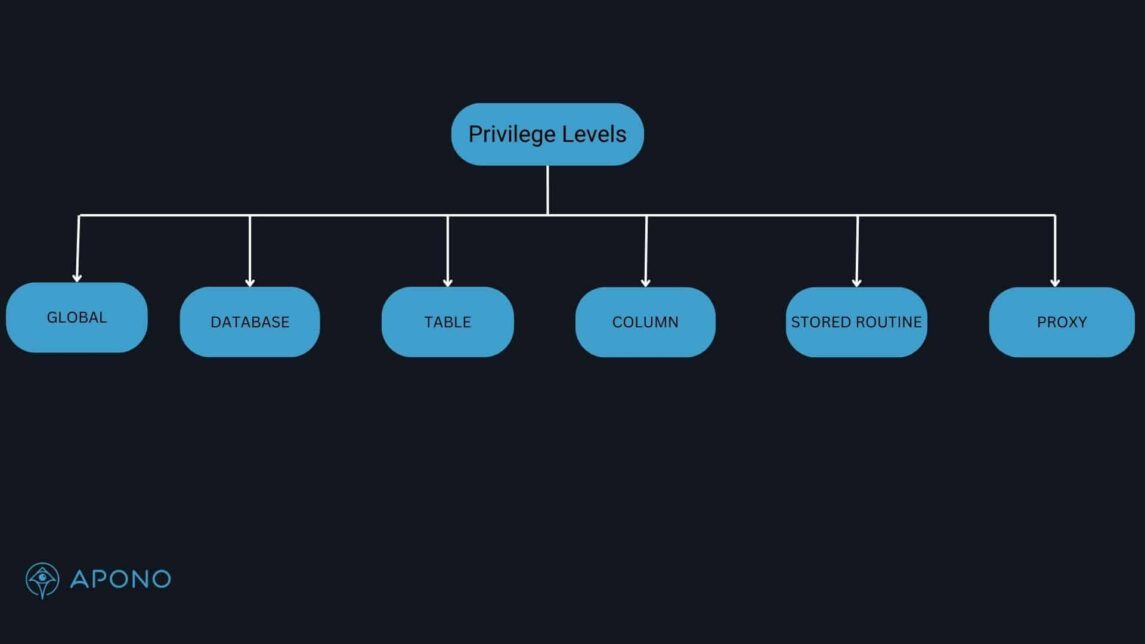
Table of Contents
Introduction to Permissions in MySQL
MySQL is a database application for Linux and part of the popular LAMP stack (Linux, Apache, MySQL, PHP). A MySQL installation includes options of managing through a root user or specific user accounts.
Managing user credentials in MySQL can be a time-consuming task, particularly when dealing with numerous MySQL instances spread across multiple servers.
In this article, we’ll be reviewing how to do the following:
- How to create users in MySQL
- How to grant user permissions in MySQL
- How to revoke user permissions in MySQL
MySQL Databases and Users
Once you have MySQL installed on the server(s) that will host your MySQL environment, you need to create a database and additional user accounts. In order to run the following commands, log into the MySQL instance with the MySQL root account.
Create MySQL databases
Creating a MySQL database involves a few simple steps. Here’s a step-by-step guide to creating a new MySQL database:
1. Create a New Database:
Now that you are connected to MySQL, you can create a new database using SQL commands. In the MySQL command-line client or phpMyAdmin, use the following SQL statement to create a new database (replace “Apono_database” with the desired name of your database):
CREATE DATABASE Apono_database;2. Verify the Database Creation:
To ensure that the database was created successfully, you can check the list of databases. In the MySQL command-line client, use the following command:
SHOW DATABASES;3. Use the New Database (Optional):
If you want to work with the newly created database, you need to switch to it using the following command in the MySQL command-line client:
USE Apono_database;That’s it! You have now successfully created a MySQL database. You can start creating tables and inserting data into it to build your application or manage your data. Remember to handle database credentials and access permissions with care to maintain security.
Create MySQL users
Creating a MySQL database involves a few simple steps. Here’s a step-by-step guide to creating a new MySQL database:
1. Install MySQL:
If you don’t have MySQL installed on your system, you need to install it first. You can download the MySQL Community Server from the official MySQL website: https://dev.mysql.com/downloads/
2. Start the MySQL Server:
Once you have MySQL installed, start the MySQL server. The process for starting the server varies depending on your operating system. On most systems, you can start the server using a command or by starting the MySQL service.
3. Connect to MySQL:
After the server is running, you need to connect to it using the MySQL command-line client or a graphical tool like phpMyAdmin.
– For the command-line client, open a terminal or command prompt and type:
mysql -u root -pYou will be prompted to enter the MySQL root password.
– For a graphical tool like phpMyAdmin, open a web browser and navigate to the phpMyAdmin URL. You can log in using your MySQL root credentials.
4. Create a New Database:
Now that you are connected to MySQL, you can create a new database using SQL commands. In the MySQL command-line client or phpMyAdmin, use the following SQL statement to create a new database (replace “Apono_database” with the desired name of your database):
CREATE DATABASE Apono_database;5. Verify the Database Creation:
To ensure that the database was created successfully, you can check the list of databases. In the MySQL command-line client, use the following command:
SHOW DATABASES;6. Use the New Database (Optional):
If you want to work with the newly created database, you need to switch to it using the following command in the MySQL command-line client:
USE Apono_database;That’s it! You have now successfully created a MySQL database. You can start creating tables and inserting data into it to build your application or manage your data. Remember to handle database credentials and access permissions with care to maintain security.
How to Grant Permissions in MySQL
To grant permissions in MySQL, you’ll need to have administrative privileges or the GRANT OPTION privilege on the database you want to modify. Here are the steps to grant permissions to a user in MySQL:
1. Connect to MySQL: Open a terminal or command prompt and connect to MySQL using a user account with administrative privileges. For example:
mysql -u root -pYou will be prompted to enter the password for the ‘root’ user or the administrative user you provided.
2. Select the database: If you want to grant permissions for a specific database, first select it using the following command:
USE Apono_database;3. Grant the permissions: Now, you can grant various privileges to the user using the `GRANT` statement. The basic syntax is as follows:
GRANT privilege_type ON database_name.table_name TO 'user'@'host';Replace `privilege_type` with the specific privileges you want to grant. Here are some common privileges:
– `SELECT`: Allows the user to read (SELECT) data from tables.
– `INSERT`: Allows the user to insert new rows into tables.
– `UPDATE`: Allows the user to modify existing rows in tables.
– `DELETE`: Allows the user to remove rows from tables.
– `CREATE`: Allows the user to create new tables or databases.
– `DROP`: Allows the user to delete tables or databases.
– `ALL PRIVILEGES`: Grants all privileges on the specified objects.
Replace `database_name.table_name` with the specific database and table (or `*` for all tables) where you want to grant the privileges.
Replace `’user’@’host’` with the username and the host from which the user will connect. For example, `’john’@’localhost’` refers to the user ‘john’ connecting from the same machine as the MySQL server.
For example, to grant SELECT, INSERT, UPDATE, and DELETE privileges on all tables of a database called ‘exampledb’ to a user ‘exampleuser’ connecting from ‘localhost’, you would use the following command:
GRANT SELECT, INSERT, UPDATE, DELETE ON exampledb.* TO 'exampleuser'@'localhost';4. Apply the changes: After executing the `GRANT` statement, you need to apply the changes for them to take effect:
FLUSH PRIVILEGES;5. Exit MySQL: When you’re done granting permissions, exit the MySQL command line interface by typing:
EXIT;
The user ‘exampleuser’ should now have the specified privileges on the ‘exampledb’ database or the specified tables within it. Make sure to grant the appropriate permissions based on your application’s requirements to ensure security and access control.
How to Revoke Permissions in MySQL
To revoke permissions in MySQL, you can use the `REVOKE` statement. This allows you to remove specific privileges from a user or role. Here’s how you can do it:
1. Connect to MySQL: Open a terminal or command prompt and connect to MySQL using a user account with administrative privileges. For example:
mysql -u root -pYou will be prompted to enter the password for the ‘root’ user or the administrative user you provided.
2. Select the database: If you want to revoke permissions for a specific database, first select it using the following command:
USE Apono_database;3. Revoke the permissions: Now, you can revoke specific privileges from the user using the `REVOKE` statement. The basic syntax is as follows:
REVOKE privilege_type ON database_name.table_name FROM 'user'@'host';Replace `privilege_type` with the specific privileges you want to revoke. These should match the privileges you previously granted to the user. For example, if you previously granted SELECT, INSERT, UPDATE, and DELETE privileges, you would use the same list of privileges in the `REVOKE` statement.
Replace `database_name.table_name` with the specific database and table (or `*` for all tables) from which you want to revoke the privileges.
Replace `’user’@’host’` with the username and the host from which the user was connecting. For example, `’john’@’localhost’` refers to the user ‘john’ connecting from the same machine as the MySQL server.
For example, to revoke SELECT, INSERT, UPDATE, and DELETE privileges on all tables of a database called ‘exampledb’ from a user ‘exampleuser’ connecting from ‘localhost’, you would use the following command:
REVOKE SELECT, INSERT, UPDATE, DELETE ON exampledb.* FROM 'exampleuser'@'localhost';4. Apply the changes: After executing the `REVOKE` statement, you need to apply the changes for them to take effect:
FLUSH PRIVILEGES;5. Exit MySQL: When you’re done revoking permissions, exit the MySQL command line interface by typing:
EXIT;That’s it! The user ‘exampleuser’ should no longer have the specified privileges on the ‘exampledb’ database or the specified tables within it. Make sure to carefully revoke only the permissions that are no longer necessary, to maintain proper access control and security.
Conclusion
You should now be able to create, modify, delete users and grant permissions in a MySQL database.
Remember, to improve security and limit accidental damage it’s important to limit users only to the privileges required for their jobs.
Check out our article about Just-in-Time Access to Databases.